
The RTX 5080 is a high-end Blackwell GPU built for 1440p high refresh gaming and strong entry-level 4K, especially once you enable modern RTX features like ray tracing, DLSS 4, and Frame Generation. With fast GDDR7 VRAM and a powerful core, it’s designed to handle today’s demanding AAA titles smoothly but there’s usually extra performance available with careful tuning.
This guide is all about safe, stable daily overclocks that actually improve FPS in real games. You’ll learn practical starting ranges for core clock offset, memory clock offset, power limit, and a sensible fan curve, plus how to validate stability with 3DMark Time Spy, Port Royal, and long gaming sessions. The aim is a reliable boost you can keep turned on every day not a one-off benchmark run.
A quick disclaimer before you start: overclocking can increase power consumption, temperatures, and fan noise, and it may affect warranty coverage if something goes wrong. Everything here avoids risky BIOS flashing or extreme LN2-style methods, but you’re still tuning beyond stock, so proceed carefully and test step-by-step.
RTX 5080 & Blackwell Architecture – What Matters for Overclocking
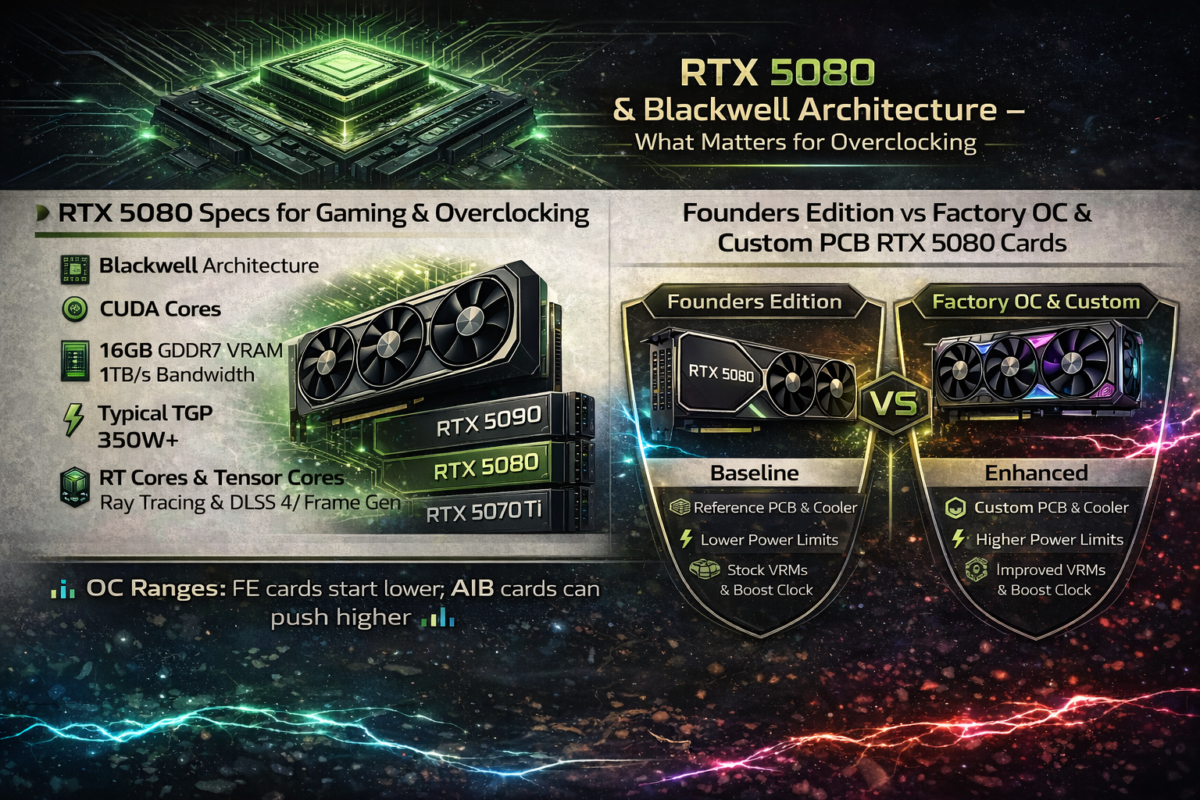
RTX 5080 Specs for Gaming & Overclocking
The RTX 5080 sits in the sweet spot of the RTX 50-series lineup: below the RTX 5090, but above cards like the RTX 5070 Ti / RTX 5070. In practice, it’s the “high-end gamer” pick strong enough for 1440p high refresh and very capable 4K gaming, especially when you lean on DLSS 4 and Frame Generation in heavier titles.
For overclocking, only a few specs really matter:
- Blackwell architecture: this is what governs efficiency, boosting behaviour, and how the GPU responds to power and temperature limits under load.
- A large CUDA core pool (exact counts vary by SKU and model listings): more cores means higher potential throughput, but only if your cooling and power headroom let the card sustain high boost clocks.
- GDDR7 VRAM and bandwidth: memory speed and bandwidth are a big deal at 1440p Ultra and 4K, where texture streaming and ray tracing can become bandwidth-sensitive. A memory clock offset can sometimes translate into real gains in 4K-heavy scenes.
- Mid-high TGP/TDP class: the RTX 5080 draws significantly less than the RTX 5090, but it’s still a high-performance GPU so power limit increases can raise heat and noise quickly if airflow isn’t sorted.
- RT Cores + Tensor Cores: RT Cores accelerate ray tracing workloads, while Tensor Cores power AI features like DLSS 4 and Frame Generation. These features can massively influence perceived FPS, and your OC mainly helps by improving raw headroom and stabilising 1% lows when the GPU is under heavy load.
The main takeaway: the RTX 5080’s overclocking potential is usually determined less by “how high can it spike in a menu” and more by how well it can sustain boost clocks in real games without hitting thermal throttling or power limits.
Founders Edition vs Factory OC & Custom PCB RTX 5080 Cards
The RTX 5080 Founders Edition (FE) is the baseline. It uses NVIDIA’s reference-level design choices: a stock PCB layout, NVIDIA’s own cooler, and the default power limits/boost behaviour you’ll see used as a “standard” in many reviews. For overclocking, FE is predictable—but it may have less headroom than the biggest partner cards simply because power and cooling limits are more tightly defined.
Factory OC AIB models (from brands like ASUS, MSI, Gigabyte and others) are built to push higher sustained performance out of the box. Compared to FE, they often include:
- Higher power limit ceilings (model-dependent, sometimes noticeably higher than reference)
- Stronger power delivery (more robust VRM design / phase count and higher-quality components)
- Bigger, quieter coolers (thicker heatsinks, extra heatpipes, higher airflow)
- Occasionally dual-BIOS modes (quiet vs performance) and slightly higher factory boost clocks
What this means for your overclock: the ranges in this guide work as a safe starting point across FE and common AIB cards, but your final stable settings will vary.
- Founders Edition cards often land toward the lower end of stable core/memory offsets, especially if you’re prioritising low noise.
- Large triple-fan AIB cards with stronger VRMs and better cooling can sometimes hold the upper end of those ranges more comfortably, because they have more thermal and power headroom.
Either way, the silicon lottery still applies. A great FE sample can outperform a mediocre factory-OC card—but as a rule, better VRMs and cooling make it easier to sustain higher boost clocks without throttling.
What You Need Before Overclocking: PSU, Cooling & Tools
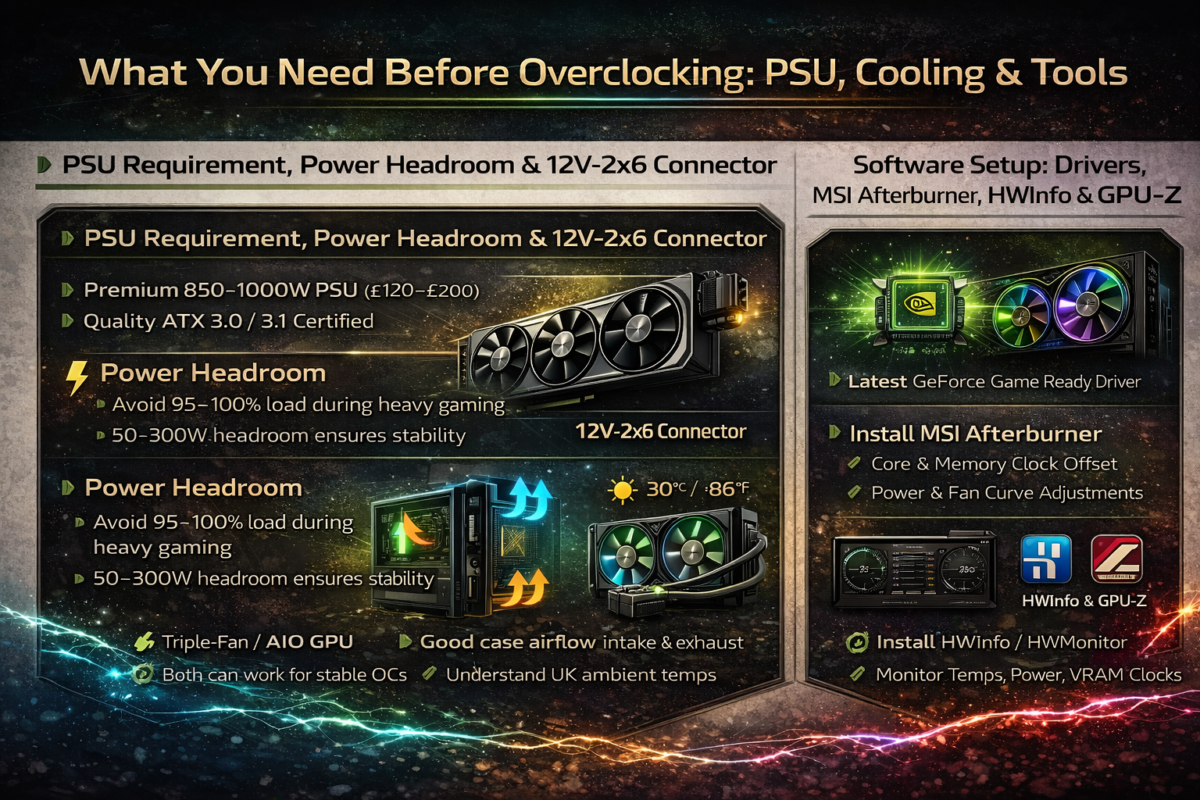
PSU Requirement, Power Headroom & 12V-2×6 Connector
Before you touch core or memory offsets, make sure your power delivery is sorted. The RTX 5080 draws less than an RTX 5090, but it’s still a high-end Blackwell card—raising the power limit and sustaining higher boost clocks will increase total system load.
For most RTX 5080 gaming builds, a quality ATX 3.0 / ATX 3.1 PSU is the right foundation:
- 850W is a sensible baseline for many systems.
- 1000W is the safer choice if you’re pairing the GPU with a power-hungry CPU, running lots of storage/fans, or planning a more aggressive daily OC.
In the UK, reputable 850–1000W ATX 3.x units commonly sit in the ~£120–£220 range depending on brand, efficiency rating, and sales.
Why Power Headroom Matters
Power headroom means leaving breathing room above your system’s peak draw. You don’t want your PSU sitting at 95–100% load during heavy gaming because:
- voltage stability can suffer under spikes
- transient loads can trigger shutdowns or crashes
- overclock stability becomes inconsistent (random TDRs, black screens, resets)
A bit of spare capacity makes your overclock more reliable and usually keeps the PSU quieter too.
12V-2×6 Cable Best Practice
Modern RTX 50-series cards use the 12V-2×6 connector (PCIe 5.x). For best results:
- Prefer a native 12V-2×6 cable from a modern ATX 3.x PSU (not cheap adapters).
- Make sure the plug is fully seated no visible gap.
- Avoid sharp bends right at the connector; route the cable with a gentle curve to reduce stress.
Good power delivery won’t make an unstable overclock stable by itself—but weak power delivery can make a perfectly reasonable OC fail randomly, especially in long gaming sessions.
Case Airflow, Ambient Temperature & Cooling Type
A stable RTX 5080 overclock is often limited by thermal headroom, not the slider values you wish your card could run. If core or junction (hotspot) temperatures climb, GPU Boost 5.0 will pull clocks back to protect the silicon — and your extra power turns into heat and fan noise instead of FPS.
Start with airflow fundamentals:
- Give the GPU a steady supply of fresh air (front/bottom intake) and a clear exit path (rear/top exhaust).
- Keep dust filters clean and don’t block the case intakes against a wall or desk panel.
- Don’t trap your PC in a hot cupboard or tight corner — it sounds obvious, but it’s a common reason “my OC used to work” suddenly stops.
Ambient temperature matters too, especially in the UK where indoor temps can vary a lot between winter and summer. A warmer room reduces overclock headroom and may mean you need to back off clocks or power limit slightly to keep junction temps under control.
Air cooling vs liquid cooling (AIO):
- A good triple-fan air-cooled RTX 5080 can absolutely handle a stable daily OC if the case airflow is decent.
- AIO/liquid cooling can help reduce sustained temps and noise, particularly in smaller cases or warmer rooms, but it isn’t required for most gaming overclocks.
The goal is simple: keep temperatures stable so the card can hold higher boost clocks consistently during long sessions.
Software Setup: Drivers, MSI Afterburner, HWiNFO & GPU-Z
Before you tune anything, get your software stack stable and your monitoring accurate.
- Update to the latest GeForce Game Ready driver, but if a brand-new release is getting early bug reports, it’s fine to stick with a known stable version while you dial in an OC.
- Install MSI Afterburner for tuning:
- core clock offset
- memory clock offset
- power limit
- fan curve
- voltage curve editor
- profile saving (daily OC vs quiet)
- Install HWiNFO (or HWMonitor) to monitor and/or log:
- GPU core temperature
- junction/hotspot temperature
- power consumption / power limit behaviour
- VRM temps (if exposed by your model)
- Use GPU-Z to verify:
- your RTX 5080 specs (including GDDR7)
- live clocks under load
- VRAM info and interface details
If you’re not watching temps, hotspot, and power draw while testing, you’re essentially overclocking blind — and that’s how unstable settings sneak through until the worst moment mid-game.
RTX 5080 Overclocking Fundamentals: Core, Memory, Power & Voltage Curve
Core Clock Offset, Boost Clock & GPU Boost 5.0
The core clock offset is the main slider most people think about when overclocking. In MSI Afterburner, you’re adding a set number of MHz on top of NVIDIA’s factory base and boost behaviour. So if you apply a +150 MHz core clock offset, you’re effectively telling the RTX 5080 to try boosting 150 MHz higher than it otherwise would.
However, because of GPU Boost 5.0, that number isn’t a fixed clock speed. NVIDIA dynamically adjusts frequency based on:
- Power limit
- Voltage
- Temperature
So a “+150 MHz” offset doesn’t mean you’ll see a locked number like 2.65 GHz all the time. Instead, boost clocks will still move around depending on load and thermal headroom. The real goal isn’t a flashy peak in a menu — it’s a stable, high sustained boost clock under real gaming load at 1440p or 4K, without triggering thermal throttling or hitting the power ceiling constantly.
Memory Clock Offset, GDDR7 & Memory Bandwidth at 1440p/4K
The memory clock offset increases the speed of your GDDR7 VRAM, which directly affects memory bandwidth. On modern high-resolution titles, especially with ray tracing enabled, bandwidth can become a real bottleneck.
At:
- 4K gaming, high-resolution textures and RT effects increase memory traffic significantly.
- 1440p high refresh, newer AAA titles can still stress VRAM and bandwidth, particularly on Ultra presets.
In bandwidth-limited scenarios, a memory overclock can produce measurable FPS gains and sometimes improve 1% lows. In contrast, if a game is purely core-limited (for example, heavy shader load with less memory pressure), you may see larger gains from a core clock offset instead.
Memory instability usually shows up first as artifacting — sparkles, flickering textures, or corrupted visuals — long before a full driver crash. That’s why memory tuning should always be done step-by-step and tested properly.
Power Limit & Efficiency Curve: Where to Stop Increasing Power
The Power Limit slider in Afterburner controls the maximum board power the RTX 5080 is allowed to draw, expressed as a percentage of its default setting. Raising it gives GPU Boost 5.0 more headroom to sustain higher clocks under load.
At first, increasing power limit can produce noticeable FPS gains because the GPU is no longer power-constrained. But GPUs follow an efficiency curve:
- Early increases = meaningful FPS improvement.
- Later increases = small FPS gains but disproportionately more heat, power consumption, and fan noise.
This guide focuses on finding that sweet spot — where you gain performance without turning your PC into a space heater. If raising power limit only gives 1–2% more FPS but adds a lot of heat and noise, you’re probably past the efficient point.
Voltage Curve Tuning, Undervolting & Overvolting
The voltage curve editor in MSI Afterburner maps frequency to voltage. Each point on the curve represents how much voltage the GPU uses to sustain a given clock.
There are two main approaches:
- Mild overvolting: Increasing voltage slightly to stabilise a higher clock. This can help hold a given boost frequency, but it increases heat and power draw and should only be done cautiously with strong cooling.
- Undervolting: Reducing voltage at a target clock to improve efficiency. On cards like the RTX 5080, undervolting can significantly reduce temperatures and noise while maintaining near-stock or lightly overclocked performance.
For a Stable Daily OC, the safest approach is:
- Start with stock voltage.
- Find your stable core and memory offsets.
- Only then consider minor voltage curve adjustments if temperatures or power draw become limiting factors.
In many cases, especially for 1440p and balanced 4K gaming, a light undervolt combined with a moderate core offset offers a better long-term result than simply pushing voltage higher.
Baseline First: Stock RTX 5080 Performance & Temps in Popular Games
How to Capture a Stock Baseline (FPS, Temps & Power)
Before you change any RTX 5080 settings, run a stock baseline. It keeps you honest—so you can see whether your overclock boosted FPS in your games, or just added heat and noise.
Pick 2–3 games across different genres, for example:
- a competitive FPS you play often (high refresh focus)
- an open-world AAA title (steady long-session load)
- a ray-tracing-heavy game (RTX + VRAM stress)
Run each game at your actual target settings:
- 1440p and/or 4K (whatever you plan to play)
- High/Ultra preset
- Ray tracing on/off as you normally use it
- DLSS 4 mode and Frame Generation on/off exactly how you play
While testing, log the same set of metrics every time:
- Average FPS and 1% lows
- RTX settings used (RT on/off)
- DLSS mode (Quality/Balanced/Performance) + Frame Generation status
- GPU core temperature and junction/hotspot temperature
- Power consumption (from HWiNFO)
- Fan speed (%) and a quick “noise impression” (quiet / noticeable / loud)
If you can, repeat each test once. Consistent stock results make it much easier to spot real improvements later.
Typical Stock Behaviour: Where RTX 5080 Sits Before OC
At stock, the RTX 5080 is generally a “set it and forget it” GPU for 1440p Ultra, delivering smooth performance and plenty of headroom for high refresh in most titles. At 4K, it’s still very strong, but in the most demanding ray-traced games you’ll often get the best experience by using DLSS 4 and Frame Generation to keep FPS high without cranking power and noise unnecessarily.
Thermally, well-cooled AIB models typically run in the 60s to 70s °C during long gaming sessions, with junction temperatures running higher as expected. That’s the baseline you’re trying to preserve—because the best daily overclock is the one that adds performance while keeping temps and noise in a comfortable range.
Once you’ve got a clean baseline, you’re in the ideal position to chase a realistic ~5–10% uplift from a stable daily OC, without guessing what actually changed.
Recommended RTX 5080 Overclock Settings (Starting Ranges)
These are typical starting ranges, not guarantees. Every RTX 5080 behaves slightly differently due to the silicon lottery, cooler design, VRM quality and case airflow. Treat this as a framework for a Stable Daily OC, not a promise that your card will hit the top end.
Core Clock Offset: Safe Starting Range for RTX 5080
Many RTX 5080 cards tend to land in the +100 to +200 MHz core clock offset range for a stable daily overclock, assuming good cooling and a quality PSU with proper power headroom.
A safe way to approach it:
- Start at +50 to +75 MHz on the core clock offset.
- Test with a quick 3DMark run or a demanding game.
- Increase in +15 to +25 MHz increments, testing after each step.
- Stop when you see instability (driver crash, black screen, stutter), then step back one increment.
Founders Edition or more compact AIB cards often cap out closer to the lower end of that range. Larger triple-fan factory-OC models with stronger cooling and custom PCBs may comfortably sit toward the upper end, sometimes slightly above it. The goal is a stable sustained boost clock under load, not just a peak number in menus.
Memory Clock Offset on GDDR7: Boosting Bandwidth
GDDR7 memory responds well to moderate tuning, especially in bandwidth-heavy scenarios like 4K gaming, high-resolution texture packs, and ray tracing.
A common stable daily range for many RTX 50-series GDDR7 cards sits roughly in the +500 to +1500 MHz effective range, depending on cooling and silicon quality.
Tune memory separately from core:
- Increase in small steps.
- Watch closely for artifacting — sparkles, flashing polygons, texture corruption.
Memory instability usually shows up visually before a full crash. If you see artifacts, step the memory clock back slightly until they disappear and re-test for stability.
Power Limit & Temperature Target for Daily Gaming
For most users, a moderate power limit increase gives the best balance of performance and efficiency.
A typical daily setting is around 105–115% Power Limit, provided:
- Your PSU has adequate headroom.
- Case airflow is solid.
- Temperatures stay under control.
For temperature targets during extended gaming sessions:
- Aim for core temperatures in the 60s to low 70s °C.
- Keep junction (hotspot) temperature comfortably below ~90 °C as a conservative long-session target.
If temperatures start climbing higher than you’re comfortable with, reduce the power limit slightly or refine your fan curve rather than pushing clocks further. Thermal headroom directly affects how well GPU Boost 5.0 can sustain performance.
Fan Curve for RTX 5080: Balancing Noise & Cooling
A custom fan curve in MSI Afterburner helps control thermals without making your system unnecessarily loud.
A simple daily setup could look like this:
- Keep fans relatively quiet up to 55–60 °C.
- Gradually ramp between 60–75 °C to prevent thermal throttling.
- Increase more aggressively above that if needed to protect hotspot temps.
You can tailor this depending on use:
- A quieter curve for single-player games or lighter loads.
- A more aggressive curve for long, demanding sessions, smaller cases, or warmer ambient temperatures.
A cooler RTX 5080 will sustain higher boost clocks more consistently — and that often matters more than squeezing out one extra 25 MHz on paper.
Building & Saving Overclocking Profiles (Stable Daily OC vs Benchmark OC)
Stable Daily OC Profile for RTX 5080
Your daily profile should be the one you can leave on for weeks without thinking about it — stable, cool enough for long sessions, and not chasing the last 1–2% at the cost of noise.
A solid Stable Daily OC typically looks like:
- Core clock offset: whatever your testing proved stable (often somewhere in that +100 to +200 MHz neighbourhood, but your card decides)
- Memory clock offset: within your no-artifact range (back off at the first sign of sparkles/flicker)
- Power limit: a modest bump (commonly 105–115% if temps and PSU headroom allow)
- Fan curve: tuned for the balance you want between temperatures and noise
Once you’ve found settings that pass benchmarks and real games, save them in MSI Afterburner as a profile (1–5). If you want the OC always enabled, you can set it to apply at startup — just make sure it’s truly stable first, or you’ll be debugging crashes every time Windows loads.
Benchmark OC Profile (Short Bursts Only)
A Benchmark OC is a more aggressive profile designed for short runs in 3DMark (or screenshots), not for everyday gaming.
It usually involves:
- slightly higher core and/or memory offsets than your daily profile
- sometimes a higher power limit
- a more aggressive fan curve
Use it only for brief tests and watch temperatures and power draw closely. Don’t run this profile 24/7 especially in summer, in smaller cases, or if you’re already close to your thermal comfort zone. If it’s stable for a single Time Spy run but crashes in real games, it’s not a daily overclock.
Stability Testing: 3DMark, Stress Tests & Real Game Sessions
Using 3DMark Time Spy & Port Royal to Validate a Stable Overclock
A simple validation loop catches most unstable overclocks quickly:
- Run 3DMark Time Spy 2–3 times with your OC applied.
You’re looking for consistent scores and no crashes, freezes, or driver resets. - Run 3DMark Port Royal to stress ray tracing and VRAM behaviour.
If Port Royal exposes flicker or sparkles, your memory OC is usually the first thing to reduce.
As you test, note the same metrics each time:
- Stock vs OC scores
- max core temp and junction temp
- max power draw
- any visible glitches or instability
Consistency matters more than a single “best run.” If run #1 passes but run #2 fails, you’re right on the edge.
Stress Testing & Long Gaming Sessions (What “Stable” Really Means)
Synthetic benchmarks are useful, but real stability is proven in real games. A profile can look fine in a quick benchmark and still fall apart 45 minutes into a demanding title.
For a true Stable Daily OC, do this:
- Play a demanding AAA game for 60–90 minutes at your normal settings (1440p or 4K, High/Ultra, RT/DLSS as you use them)
- Watch for:
- stutters that weren’t present at stock
- random game closes
- driver resets / black screens
- artifacting (sparkles, texture corruption)
A good rule of thumb: if you can play your usual games for 1–2 hours with no issues, that profile is probably safe to keep. If anything looks off, back down memory first, then core, then power limit and re-test.
Troubleshooting RTX 5080 Overclocks: Artifacting, Driver Crashes & TDR
How to Spot and Fix Artifacting, Stutters & Thermal Throttling
If your RTX 5080 overclock is almost stable, the symptoms usually show up in a few predictable ways.
Artifacting (usually memory too high) often looks like:
- sparkling pixels or “glitter” in shadows
- flashing polygons or random geometric shapes
- corrupted textures or flickering surfaces (often worse with ray tracing)
When you see artifacts, assume memory clock offset is the problem first. Back it down slightly and re-test.
Thermal throttling is different: it’s the GPU protecting itself by dropping clocks as temperatures approach limits. You’ll notice:
- FPS slowly dipping after 10–20 minutes
- core clocks suddenly falling in HWiNFO / Afterburner
- fans ramping harder but performance still dropping
Fix it in this order:
- Reduce memory offset one step if you see any visual glitches.
- If stutter or instability continues, lower core offset slightly.
- If temps are high, reduce power limit and/or set a more aggressive fan curve.
- Improve case airflow (clean filters, add intake, remove obstructions) if temps keep climbing.
A stable daily OC should feel invisible: no odd flicker, no random dips, no “it’s fine until it isn’t”.
Handling Driver Crashes & TDR Timeouts on RTX 5080
A driver crash is when a game closes, the screen goes black, or Windows recovers the display driver and you get a message like “driver stopped responding.” That’s often a TDR event.
TDR (Timeout Detection and Recovery) is Windows’ safety mechanism. If the GPU stops responding (commonly due to unstable clocks/voltage), Windows resets the driver to prevent a full system lock-up.
Use a simple back-off ladder:
- Drop memory offset one step (memory instability is common and often shows first).
- If it still crashes, drop core offset one step.
- If temps or power draw are high, reduce power limit and/or tune the fan curve.
- If crashes continue, revert to stock, confirm stability, then rebuild a more conservative OC step-by-step.
Avoid changing five things at once. One change, one test that’s how you find what actually fixed it.
When Undervolting RTX 5080 Makes More Sense Than More Offset
If you’re hitting thermal limits, noise limits, or PSU limits, pushing more MHz can be the wrong direction. In those cases, undervolting often produces a better daily result.
Undervolting means using the voltage curve to run a target clock at less voltage, which typically:
- reduces power consumption
- lowers core and junction temperatures
- cuts fan noise
- improves sustained boost behaviour in long sessions
For 1440p gaming (and lighter 4K), a mild undervolt can keep performance very close to stock sometimes with similar “feel” to a small overclock but with far better efficiency and stability.
If you want the next step-by-step, link this section to your site’s undervolting/efficiency guide (best place to help reader
How Much FPS Gain Can You Expect from Overclocking RTX 5080?
Typical FPS Gains in Popular PC Games
With a well-tuned stable daily OC (moderate core and memory offsets, sensible power limit, and temps under control), many RTX 5080 users see roughly ~5–10% extra FPS in demanding games. That uplift can be enough to turn “almost always above 100 FPS” into “comfortably above 100 FPS”, and it often helps smooth out 1% lows in heavy scenes.
The size of the gain depends on what’s limiting the game:
- In GPU-bound titles, you’ll see the most consistent improvement.
- If a game is CPU-limited (especially at lower resolutions), the FPS gain can be smaller because the GPU isn’t the bottleneck.
- If you’re running Ray Tracing Ultra with everything maxed and already near your thermal/power limits, gains can flatten quickly unless you have strong cooling and headroom.
It’s also worth remembering that DLSS 4 and Frame Generation can create a far bigger perceived FPS jump than a small overclock. Overclocking still matters, though—it can improve minimums and frame-time stability, which is what keeps gameplay feeling smooth when things get intense.
1080p, 1440p & 4K: Where RTX 5080 Overclocking Helps Most
1080p / 1440p competitive (165–240 Hz)
Overclocking can help maintain higher FPS more consistently in shooters, especially during chaotic fights where frame rates dip. But at these resolutions you may hit CPU limits, so the gain isn’t always huge—still, stronger 1% lows can be noticeable.
1440p Ultra (sweet spot for RTX 5080)
This is where a daily OC often feels the most “worth it.” Many modern AAA games at 1440p Ultra (often with RT + DLSS) benefit from the extra headroom, helping you stay above 100+ FPS more consistently and reducing drops in heavy scenes.
4K gaming
A stable OC can provide a nice uplift, but DLSS 4 and Frame Generation usually remain the key to very high FPS in RT-heavy titles. Think of the overclock as a steady efficiency and smoothness boost—useful, but not the main lever compared to DLSS/FG settings.
If your priority is esports responsiveness rather than max visuals, you can tune slightly differently: focus more on core stability, keep temps low, and avoid unnecessary power-limit pushing that adds noise and heat for minimal real benefit.