Introduction – Why Tuning Your RTX 5090 Matters for Hardcore Doom
Doom: The Dark Age is a visually demanding, fast-paced game that pushes GPUs to their limits. Even with a high-end card like the RTX 5090, maintaining consistent high FPS, low input lag, and smooth frame-time across long gaming sessions can be a challenge. This is where GPU tuning, including overclocking and undervolting, becomes crucial for competitive and immersive gameplay.
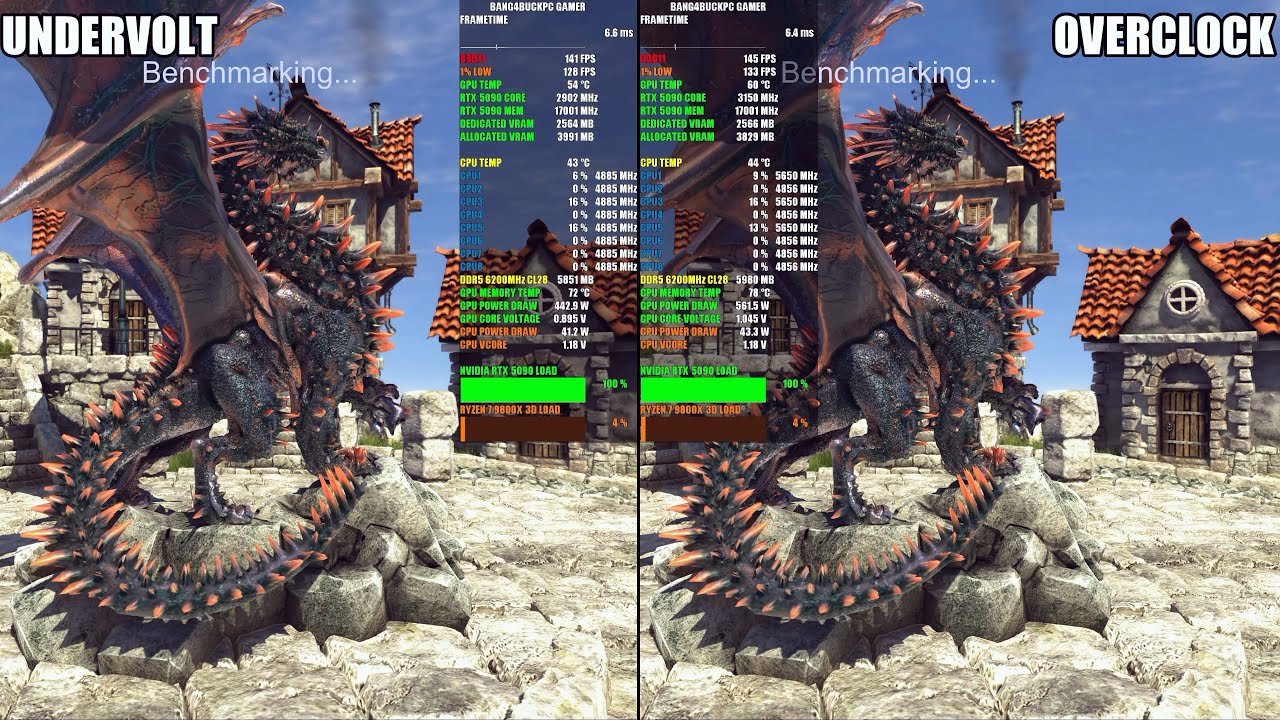
Overclocking increases your core and memory clock speeds, giving the GPU more computational headroom to handle intense sequences, such as hellish effects, ray tracing, and particle-heavy environments. Conversely, undervolting lowers the GPU voltage, reducing heat output and power consumption, which is critical during marathon Doom sessions where sustained performance is essential. Both approaches, when done safely, allow the RTX 5090 to operate at peak efficiency while maintaining thermal stability.
Why tuning matters for Doom: The Dark Age
- Sustained high FPS: Overclocking ensures that even the most chaotic encounters remain smooth.
- Thermal management: Undervolting reduces GPU temperatures, preventing thermal throttling and loud fan noise.
- Stable frame-times: Proper tuning prevents stutter, lag spikes, or dropped frames, ensuring fluid gameplay.
- Maximized GPU potential: Unlocks the full capabilities of CUDA cores, VRAM, and memory bandwidth for demanding graphics.
Overclocking vs Undervolting: Understanding the Balance
| Approach | Benefits | Risks if Misconfigured |
|---|---|---|
| Overclocking | Higher FPS, improved responsiveness | Crashes, artifacting, overheating |
| Undervolting | Lower temps, quieter operation, longer GPU lifespan | Potential FPS drop if too aggressive |
| Combined Tuning | Balanced performance & efficiency | Needs careful incremental testing |
Common Pitfalls of Improper GPU Tuning
- Crashes or black screens during intense gaming sequences.
- Unstable frame-times leading to stuttering or input lag.
- Excessive heat causing fan noise and potential long-term damage.
- VRAM overload if high-resolution textures or ray tracing are used without proper tuning.
By understanding the demands of Doom: The Dark Age and the capabilities of the RTX 5090, you can tailor GPU tuning to achieve maximum FPS, stable frame-time, and quiet thermals. The following sections will guide you through preparation, step-by-step overclocking, undervolting, fan curve optimization, and troubleshooting, ensuring that your GPU runs efficiently for marathon sessions of hellish combat.
Preparing Your System for Safe GPU Tuning
Before you start overclocking or undervolting your RTX 5090 for Doom: The Dark Age, it’s critical to prepare your system properly. Skipping these steps can lead to instability, overheating, or even long-term damage to your GPU. This section walks you through the essential preparation steps to ensure a stable, high-performance gaming experience.
1. Update GPU Drivers and Firmware
Keeping your GPU drivers and firmware up to date ensures optimal compatibility with Doom: The Dark Age, and provides access to the latest tuning, monitoring, and stability improvements from NVIDIA.
- Download the latest drivers from the NVIDIA website.
- Use the clean install option during updates to remove old driver remnants.
- Update motherboard BIOS and any GPU firmware if available to enhance stability.
2. Close Background Processes
High-end games combined with overclocked GPUs require maximum CPU and GPU resources. Background apps can introduce frame-time spikes, stuttering, and input lag.
- Close web browsers, streaming apps, and background downloads.
- Disable unnecessary startup programs.
- Use Task Manager or third-party apps to monitor CPU and GPU usage.
3. Benchmark Baseline Performance
Before modifying GPU clocks or voltages, benchmark your system to understand the baseline FPS, GPU temps, and voltage. This provides a reference to measure improvements and detect instability.
| Benchmark Metric | Recommended Tool | Notes |
|---|---|---|
| FPS & Frame-Time | MSI Afterburner, FRAPS | Capture average & 1% lows |
| GPU Temperature | HWInfo64, GPU-Z | Monitor core and hotspot temps |
| Voltage & Power Usage | MSI Afterburner | Baseline for safe overclock/undervolt |
4. Install Monitoring Tools
Reliable monitoring is essential for safe tuning. You need real-time feedback on temperature, voltage, GPU load, and FPS.
- MSI Afterburner: Core/memory clock adjustments, fan curve, real-time overlay.
- GPU-Z: Detailed GPU specifications, voltage, memory, and clock stats.
- HWInfo64: System-wide monitoring including CPU, VRAM usage, and thermal hotspots.
5. Check System Cooling & Ambient Conditions
Long Doom sessions put your GPU under sustained load. Ensuring proper cooling is critical:
- Verify case airflow: intake and exhaust fans functioning properly.
- Clean dust from fans and radiators.
- Keep ambient room temperature low to prevent thermal spikes.
Step-by-Step Overclocking RTX 5090
Overclocking your RTX 5090 can significantly boost FPS in Doom: The Dark Age, especially during intense, hellish combat sequences. Done properly, it enhances core and memory clock speeds without compromising stability or thermal limits. This section outlines a safe, incremental approach to maximize performance.
1. Start Incrementally
Never push clocks to their maximum immediately. Incremental adjustments reduce the risk of crashes or GPU damage.
- Increase core clock by +10–25 MHz increments.
- Increase memory clock cautiously, typically +25–50 MHz at a time.
- After each increment, test for stability before proceeding further.
Tip: Use the RTX 5090’s factory overclock as your starting baseline.
2. Stability Testing After Each Step
Benchmarking ensures your overclock is safe and effective:
| Test Type | Recommended Tool | Target Outcome |
|---|---|---|
| Synthetic Benchmark | 3DMark, Heaven | No crashes or artifacting |
| Game Benchmark | Doom: The Dark Age | Smooth FPS, stable 1% lows |
| Temperature Check | MSI Afterburner, HWInfo | Core ≤ 85°C, Hotspot ≤ 95°C |
- Monitor GPU temperature, fan RPM, and voltage closely.
- If instability appears (crashes, flickering), reduce the clock by one step and retest.
3. Adjust Power Limit and Fan Curve
A stable overclock requires proper power and thermal management:
- Increase power limit in MSI Afterburner gradually (e.g., +10–15%) to maintain stability.
- Create a fan curve that ramps up fan speed before temperatures reach critical levels.
- Avoid maximum fans constantly—balance noise vs cooling efficiency.
4. Fine-Tuning for Gaming Sessions
Once initial overclocking is stable, optimize for extended gameplay:
- Adjust voltage only if temperatures are high; a slight undervolt can improve thermal headroom.
- Test with real Doom gameplay for at least 30–60 minutes to detect subtle instability.
- Monitor 1% lows to ensure smooth frame-time consistency during intense sequences.
5. Document Your Settings
Keep a record of stable overclock parameters:
| Parameter | Stable Value | Notes |
|---|---|---|
| Core Clock | +X MHz | Tested at max load |
| Memory Clock | +Y MHz | Tested for VRAM stability |
| Power Limit | +Z % | Maintains stability |
| Fan Curve | Custom Profile | Optimal temp vs noise |
Documenting settings ensures you can restore stability quickly if future adjustments or driver updates affect performance.
Undervolting RTX 5090 for Cooler, Longer Sessions
While overclocking increases performance, undervolting is the ideal strategy for gamers seeking cooler, quieter, and more efficient long-term Doom sessions on the RTX 5090. Proper undervolting reduces GPU temperature, power consumption, and fan noise while maintaining FPS and frame-time consistency. This section outlines safe undervolting techniques for extended gameplay.
1. What Undervolting Does
Undervolting lowers the core voltage supplied to the GPU without reducing clock speeds, resulting in:
- Lower thermal output, preventing thermal throttling.
- Reduced fan noise since less heat is generated.
- Slightly improved GPU efficiency, extending component lifespan.
- Stable FPS and frame-time when done properly.
Key Tip: Always undervolt incrementally and monitor stability—too aggressive undervolting can cause crashes.
2. Step-by-Step Undervolting
- Open MSI Afterburner and enable the voltage/frequency curve editor.
- Start with a baseline voltage (usually ~1.0–1.05V for RTX 5090).
- Reduce voltage in 10–15 mV increments, testing stability at each step.
- Keep clocks at default or mildly overclocked values while testing.
- Use stress tests and in-game benchmarks to ensure no artifacts or crashes occur.
3. Combining Undervolt with Mild Overclock
For balanced performance:
- Slightly increase core clock (+10–20 MHz) while undervolting.
- Maintain memory clock stability to prevent VRAM errors.
- Adjust power limit minimally to preserve efficiency.
Result: Higher FPS than stock settings, lower temperatures, and longer sustained performance during marathon Doom sessions.
4. Monitoring and Thermal Management
| Metric | Target Range | Notes |
|---|---|---|
| Core Temperature | ≤ 75–80°C | Safe for extended gaming |
| Hotspot Temperature | ≤ 85–90°C | Prevents thermal throttling |
| GPU Voltage | 0.98–1.03V | Stable undervolt range |
| Fan RPM | Custom curve, quiet profile | Ramp-up before 70°C |
- Adjust fan curves to optimize cooling while minimizing noise.
- Check 1% lows and frame-times during long gameplay sessions to confirm stability.
5. Optional In-Game Adjustments
- Reduce unnecessary post-processing or particle density only if GPU load spikes.
- Combine DLSS 4 in Balanced or Performance mode to reduce GPU stress without visual compromise.
- Monitor GPU load regularly to avoid thermal surprises during intense Doom battles.
Fan Curve & Thermal Management
Optimizing your RTX 5090 fan curve is critical for maintaining stable performance in Doom: The Dark Age, especially during long, high-intensity sessions. Even with overclocking or undervolting, inadequate cooling can lead to thermal throttling, FPS drops, and unstable frame times. This section provides a complete guide to configuring fan curves and managing GPU thermals.
1. Why Fan Curves Matter
The fan curve controls how aggressively your GPU fans respond to temperature changes:
- Steep curves: Quickly ramp fans at lower temperatures, keeping the GPU cooler but generating more noise.
- Shallow curves: Fans ramp slowly, quieter, but temperatures rise faster.
- Proper tuning balances noise, thermals, and performance stability.
Pro Tip: A well-configured fan curve complements undervolting or mild overclocking for marathon gaming sessions.
2. Creating an Optimized Fan Curve
- Open MSI Afterburner or similar GPU tuning software.
- Access the fan curve editor (temperature vs. fan speed).
- Set key temperature points based on your target thermal ranges:
| Temperature (°C) | Fan Speed (%) | Notes |
|---|---|---|
| 40 | 25 | Idle or light load |
| 60 | 50 | Moderate load, silent operation |
| 70 | 65 | High load, gaming |
| 80 | 85 | Heavy load, maintain stability |
| 90+ | 100 | Prevents thermal throttling |
- Ensure the curve ramps gradually to avoid sudden noise spikes.
- Test in-game with monitoring overlays to confirm stable temperatures.
3. Thermal Management Best Practices
- Maintain ambient airflow in your PC case; intake/exhaust fans are crucial.
- Keep GPU and CPU temps under control to prevent throttling or crashes.
- Combine fan curve optimization with undervolting to reduce heat production.
- Avoid constant maximum fan speeds—they’re unnecessary for normal load and reduce fan lifespan.
4. Monitoring During Gameplay
- Use tools like HWInfo64 or MSI Afterburner to track GPU core and hotspot temperatures.
- Monitor frame-time stability and 1% lows—thermal spikes often correlate with FPS drops.
- Adjust curve aggressiveness if long Doom sessions push temperatures near critical limits.
5. Optional Enhancements
- For silent setups, prioritize mild temperature rises with low-noise fans, using DLSS 4 Performance mode to reduce load.
- Consider liquid cooling solutions for extreme overclocking and high-density GPU usage.
- Maintain dust-free components to maximize thermal efficiency and fan performance.
In-Game Considerations for Overclocked/Undervolted GPUs
Once your RTX 5090 is overclocked or undervolted, optimizing in-game settings in Doom: The Dark Age is essential to sustain high FPS, stable frame times, and minimal latency. Improper configuration can negate the benefits of GPU tuning and introduce stutter, thermal spikes, or power inefficiencies. This section highlights the key adjustments to maximize performance while retaining visual fidelity.
1. Adjust Visual Settings Strategically
Even with a high-end GPU, balancing visual quality and performance is critical:
- Texture Quality: Ultra textures are ideal if VRAM allows; otherwise, reduce slightly to avoid spikes.
- Shadow Quality: Lower shadow distance or resolution if FPS drops during combat-heavy scenarios.
- Lighting Effects: Reduce volumetric lighting in intense areas to prevent GPU load spikes.
- Particle and Hellfire Effects: Decrease density moderately without sacrificing gameplay cues.
Pro Tip: Keep critical visual cues (enemy highlights, environment hazards) at high settings for gameplay advantage.
2. Ray Tracing and DLSS 4 Balance
The RTX 5090 handles Ray Tracing, but aggressive settings can impact frame rate:
| Setting | Recommendation | Notes |
|---|---|---|
| Ray Tracing Quality | Medium to High | Preserve reflections & lighting |
| DLSS 4 Mode | Balanced or Performance | Reduces GPU load while maintaining visuals |
| Multi-Frame Generation | Enabled | Smooths frame-time spikes |
- Using DLSS 4 Performance mode combined with Frame Generation can maintain high FPS even at 4K resolution.
- Monitor 1% lows to ensure stutter-free gameplay during chaotic combat sequences.
3. Visual Effects vs. Sustained FPS
- Bloom and Post-Processing: Reduce if FPS drops below desired thresholds.
- Anti-Aliasing: Use TAA or DLSS-based upscaling rather than native MSAA to lower GPU load.
- Reflections: Moderate settings maintain visual realism without spiking power draw.
Tip: Create a custom profile that adjusts effects dynamically for different maps or combat intensity.
4. Frame-Time and Responsiveness
- Overclocking or undervolting enhances FPS, but frame-time consistency is crucial for fluid gameplay.
- Track GPU load, temperature, and FPS during intense combat zones.
- Avoid pushing visual settings that spike hotspot temperatures, triggering thermal throttling.
Troubleshooting Overclocking/Undervolting Issues
Even with careful overclocking or undervolting, your RTX 5090 may encounter issues such as instability, thermal spikes, or visual artifacts during Doom: The Dark Age sessions. Effective troubleshooting ensures long-term stability, optimal FPS, and hardware safety. This section provides a structured approach to diagnosing and resolving GPU tuning issues.
1. Common Issues After GPU Tuning
Overclocking or undervolting can introduce several challenges:
- Crashes to Desktop (CTD): Usually caused by excessive core/memory clock increases or insufficient voltage.
- Artifacting: Flickering textures, colored blocks, or screen tearing. Often due to aggressive overclocking or thermal stress.
- Thermal Throttling: FPS drops when GPU temperature exceeds safe limits.
- Black Screens: Caused by unstable voltage or driver conflicts.
Pro Tip: Keep a baseline profile saved in MSI Afterburner for quick rollback.
2. Step-by-Step Troubleshooting
A. Stability Testing
- Run stress tests like 3DMark, Heaven Benchmark, or Cyberpunk 2077 in Ultra settings.
- Observe GPU temperatures, FPS, and 1% lows.
- Identify performance drops or artifacts linked to specific clock/voltage values.
B. Adjusting Core and Memory Clocks
- Reduce core clock by 10–20 MHz if instability persists.
- Decrease memory clock incrementally to stabilize VRAM-heavy areas.
- Use undervolting to reduce heat without sacrificing FPS.
C. Thermal Management
- Verify fan curve effectiveness: Ensure fans ramp before temperatures exceed 80°C.
- Improve case airflow or add supplemental cooling for hot zones.
3. Driver & Software Checks
- Update NVIDIA drivers to latest stable release.
- Ensure MSI Afterburner or other tools are compatible with current GPU drivers.
- Reset in-game graphics settings to default to rule out software conflicts.
4. Monitoring Tools & Metrics
| Tool | Purpose | Key Metrics |
|---|---|---|
| MSI Afterburner | OC/Undervolt control, fan curve | Core/Mem clocks, temps, FPS |
| HWInfo64 | Sensor monitoring | Hotspot/core temp, VRAM usage |
| GPU-Z | Detailed GPU statistics | Power draw, clock stability |
- Track GPU load, power consumption, and hotspot temps during extended gaming sessions.
- Identify patterns of instability related to specific game zones or effects.
5. Quick Recovery Tips
- Always roll back to last stable profile if crashes occur.
- Revert core/memory clocks and voltage in small increments.
- Combine DLSS 4 Performance mode with mild GPU tuning to reduce stress.
- Keep monitoring 1% lows to ensure stutter-free gameplay.