You’ve just dropped serious money on an RTX 5090, fired up your favourite AAA at 4K, and… it still hitches. Micro-stutters during big set pieces, tiny freezes when you pan the camera, a bit of mushiness on the mouse even though the FPS counter says 120+. It feels wrong when a flagship GPU behaves like this, and simply cranking every setting to “Ultra” clearly isn’t the answer.
The reality is simple: high average FPS ≠ genuinely smooth gameplay. What matters is how consistent each frame is, how low your input latency is, and whether your system is feeding the 5090 properly from PSU and CPU, through BIOS and Windows, to your 4K monitor or TV.
This guide walks you through that full chain in a logical order:
hardware → BIOS/OS → display → NVIDIA settings → in-game tweaks → testing and troubleshooting.
You don’t need to be an overclocker or a PC engineer. Set aside an evening, follow the steps, and by the end you should have:
- Far fewer random stutters at 4K.
- Noticeably snappier mouse and controller response.
- A repeatable optimisation process you can apply to any modern AAA game.
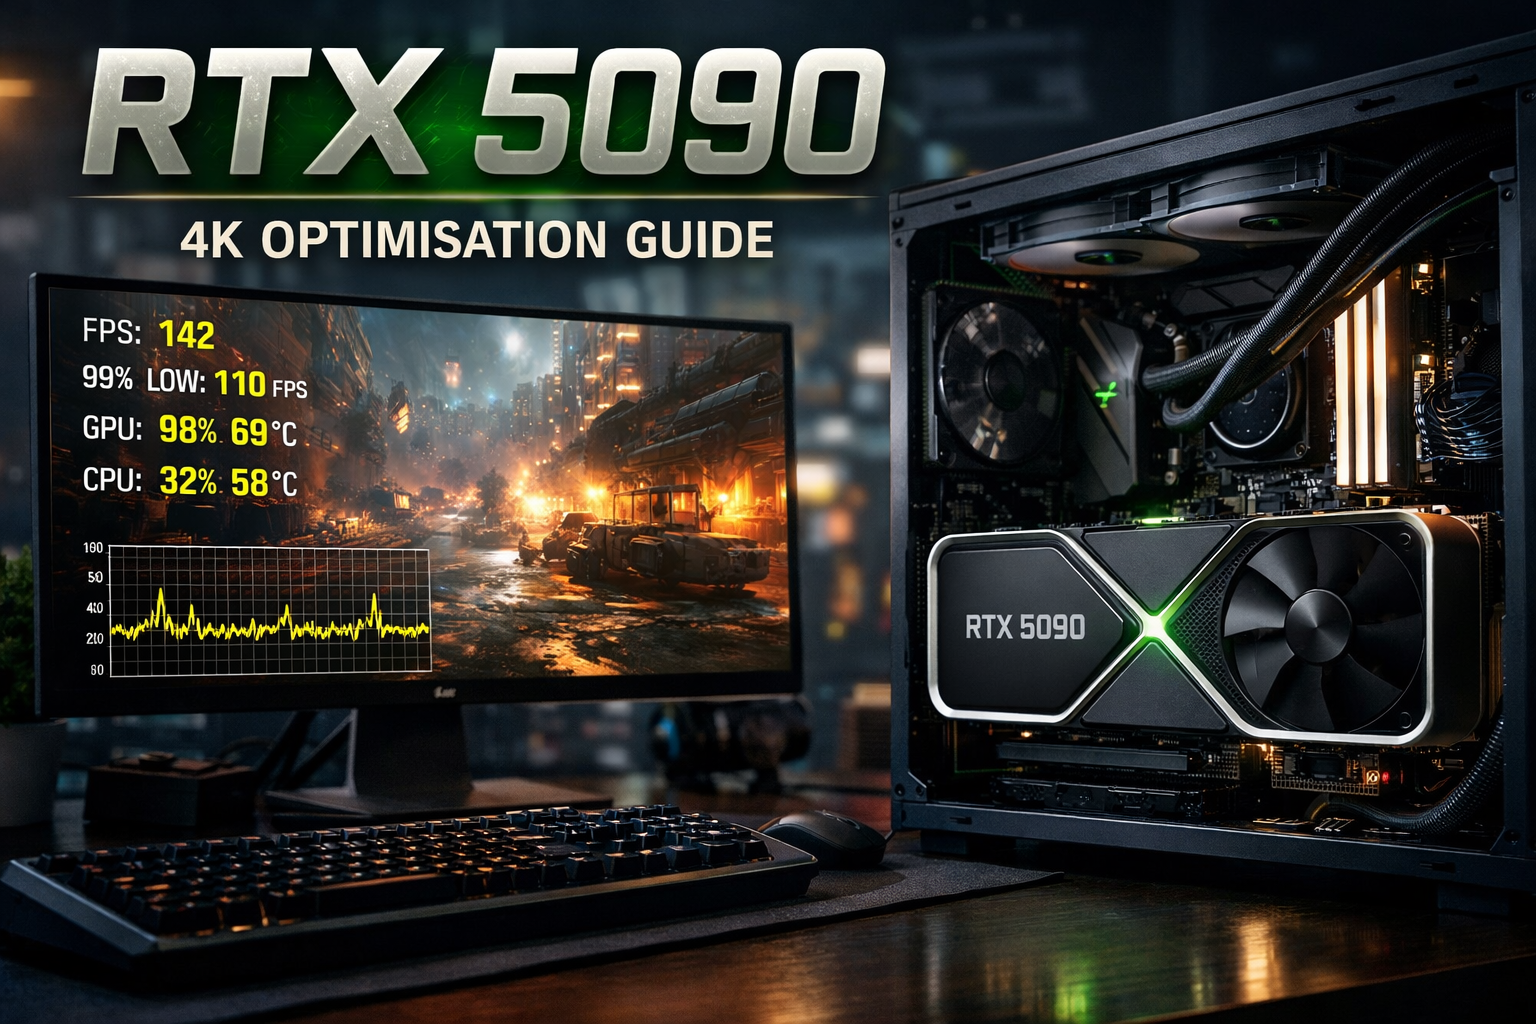
What “True 4K Ultra” Really Means on an RTX 5090
When we say “true 4K ultra” on an RTX 5090, we’re not talking about a menu preset we’re talking about 3840×2160 resolution, ultra-grade image quality and consistently smooth motion during actual gameplay, not just in a benchmark.
At a basic level, that means:
- Native 4K resolution (3840×2160) or 4K output with smart reconstruction (e.g. DLSS in Quality mode).
- Ultra or very high presets for core visual features like textures, geometry and effects.
- Ray tracing enabled where it adds meaningful visual benefit, not just pushed to “Psycho” for the sake of it.
Performance-wise, the target is not “whatever FPS is highest”. For 4K on a 5090:
- Minimum bar: a stable 60 fps with decent 1% lows.
- Ideal for high refresh panels: 100–144 fps, or a solid cap just below your monitor’s refresh rate with VRR (G-Sync / FreeSync) doing its job.
Two metrics matter more than the headline average FPS:
- 1% lows – this is the average of your worst 1% of frames. If your average is 110 fps but your 1% low is 35, the game will feel choppy during explosions, city hubs or cutscenes.
- Frame-time consistency – each frame should take roughly the same time to render. Big spikes on a frametime graph (e.g. from 8 ms to 40 ms) are what you perceive as hitching or micro-stutter, even if the FPS counter barely moves.
An RTX 5090 has enough raw horsepower to brute-force many modern titles at 4K ultra, especially if you’re happy with a 60–90 fps target. But even this kind of GPU will run into limits in:
- Ultra-heavy ray-traced titles.
- Poorly optimised PC ports.
- CPU-bound open worlds or dense city scenes at high refresh rates.
That’s where “true 4K ultra” becomes about smart settings, not ego settings: using DLSS or similar reconstruction in the right mode, pulling back the most expensive RT options by one notch, and prioritising frametime stability over one more shadow slider on max. This guide is built around exactly that definition.
Step 1 – Make Sure Your System Isn’t Bottlenecking the RTX 5090
Before you touch a single in-game setting, you need to make sure the RTX 5090 can actually stretch its legs. A top-end GPU will still stutter if it’s being starved of power, cooked by poor airflow, or jammed into a case with spaghetti cabling. Think of this step as checking the “plumbing” that feeds the card – if this is wrong, nothing else in the guide will feel right.
Power supply, cooling and physical setup
For a 5090-class build, you want a high-quality PSU from a reputable brand, not just a big number on the label. As a rule of thumb:
- Aim for at least 1000 W in a typical high-end gaming system, more if you’re running a power-hungry CPU and lots of drives.
- Look for 80+ Gold or better, and modern PCIe 5.0 / 12VHPWR support where applicable.
Next, check the PCIe cabling:
- Use the proper dedicated GPU cables from the PSU, not cheap splitters from random marketplaces.
- Make sure each connector clicks in fully and that the 12VHPWR (if used) isn’t bent sharply right at the plug – that can cause heat and instability.
- Avoid daisy-chaining multiple 8-pins off a single thin cable where the manufacturer doesn’t recommend it.
Cooling and layout matter just as much:
- The RTX 5090 is a big, hot card – it needs room to breathe.
- Ensure there are clear intake fans at the front and at least one exhaust fan at the rear/top.
- If your case has a solid glass front or the GPU is pressed up against a side panel, expect higher temps and more chance of thermal throttling.
Watch for classic power/thermal warning signs when you’re in a heavy game or stress test:
- Clocks suddenly dropping by a few hundred MHz while temps spike.
- GPU fans ramping to near 100% and staying there.
- Hard stutters under load, black screens, or full system reboots when the card is pushed.
If you see any of these, treat them as a red flag: either your PSU is marginal, your cabling isn’t ideal, or your airflow simply isn’t moving enough heat out of the case. Fixing those fundamentals first often removes the worst 4K stutters before you even touch software settings.
CPU and RAM – when they become the real bottleneck
At 4K, the GPU is usually the main limiting factor – the RTX 5090 is doing most of the heavy lifting pushing 8.3 million pixels every frame. But once you start chasing high refresh rates (120–144 Hz), or you play CPU-heavy games (big open worlds, MMOs, strategy titles), your processor and memory can quietly become the real bottleneck.
A classic sign is the utilisation pattern:
- Your GPU usage is hovering at 60–70% or even lower.
- One or more CPU threads are pinned near 100% during busy scenes.
In that situation, no amount of dropping graphics settings will fix stutter, because the GPU is waiting around for the CPU to feed it frames.
For RAM, modern 4K gaming with a 5090 really wants:
- At least 32 GB of system memory.
- RAM running at its rated speed with the correct profile enabled (we’ll cover that in a second). Slow or misconfigured RAM can make CPU bottlenecks worse, especially in open-world games with lots of streaming.
Simple sanity check for expectations:
- If you’re on an older mid-range CPU (e.g. a few generations back, or something that was never top-tier), you can still enjoy superb 4K visuals – but don’t expect rock-solid 144 Hz in the heaviest, most demanding titles.
- Aim for a stable 90–120 fps with strong 1% lows instead of obsessing over hitting the panel’s absolute maximum refresh in every scenario.
The goal here isn’t to turn your CPU into something it isn’t – it’s to understand whether CPU/RAM, not the 5090, are what’s actually limiting your experience.
BIOS and OS basics that affect the GPU
Before you dive into game menus, it’s worth spending a few minutes in the BIOS and Windows to unlock performance you’ve already paid for.
In the BIOS, check for:
- Resizable BAR / Above 4G Decoding – enable this for modern GPUs. It lets the CPU access more of the card’s memory at once, which can improve performance and reduce stutter in some titles.
- Memory profiles (XMP/EXPO) – make sure your RAM isn’t stuck at a low default speed. Enable the correct profile so it runs at its advertised MHz and timings.
In Windows, do a quick optimisation pass:
- Install the latest stable updates so you’re not fighting old GPU scheduling or driver issues.
- Turn Game Mode on to help prioritise game processes and reduce background noise.
- Consider enabling Hardware-accelerated GPU scheduling (HAGS) if your driver and setup play nicely with it; in some cases it can shave a bit of latency and smooth out frametimes. If you see weird behaviour after turning it on, you can always toggle it back off.
These BIOS/OS basics don’t look exciting, but they form the foundation that lets the RTX 5090 operate as intended. Get them right once, and every game you launch afterwards benefits.
Storage and background tasks
Even with an RTX 5090 and fast CPU, you can still get random hitches that have nothing to do with raw GPU power. Two common culprits: slow storage and noisy background apps quietly chewing resources.
First, storage. Modern AAA games stream in huge amounts of data as you move through the world – textures, geometry, audio, cutscenes. If that data is sitting on a slow drive, the GPU ends up waiting:
- Install your main games on a fast NVMe SSD, not an old SATA SSD and definitely not a mechanical hard drive.
- If you have multiple NVMe drives, keep your heaviest, most open-world or ray-traced games on the fastest one with the most free space.
- Avoid running your drive at 95–99% full – it can slow down and increase stutter as it struggles to juggle files.
When storage can’t keep up, you’ll see:
- Brief freezes when entering new areas or turning quickly in dense environments.
- Texture “popping in” late, even though your FPS counter looks decent.
Next, background tasks. Anything that wakes up the CPU or hits the disk at the wrong time can cause frametime spikes:
Close or minimise:
- Browsers with lots of tabs open, especially ones playing video or running web apps in the background.
- Heavy overlays (third-party performance monitors, chat overlays) you don’t actually need in that session.
- Bloated RGB control suites, hardware dashboards, or “optimiser” tools that constantly poll sensors.
- Capture and streaming tools when you’re not actively recording – they can reserve CPU/GPU time and I/O bandwidth even when idle.
Individually, each of these might only steal a few milliseconds here and there. But games are sensitive to timing: a background task doing a quick scan or an overlay refreshing at the wrong moment shows up as one ugly spike on your frametime graph – which you feel as a hitch, input “stickiness”, or a tiny freeze just as you line up a shot.
As a rule:
- Put your key games on NVMe.
- Keep the drive with those games reasonably empty and healthy.
- Treat your first gaming run after a reboot as a “clean session” – only your launcher, your overlay of choice, and the game itself.
Do this, and you remove a whole class of random micro-stutters that can make a 4K/Ultra setup feel worse than it should, even when the FPS numbers look perfect.
Step 2 – Set Up Your 4K Display Correctly
Once the system itself is in good shape, the next step is making sure your RTX 5090 and 4K panel are actually talking at the right resolution and refresh rate with minimal latency. A misconfigured cable, wrong port or outdated HDMI standard can quietly cap you at 60 Hz, break VRR, or add extra input lag – even though the GPU is capable of far more.
This section is about getting the physical link right first, so every optimisation you make later (NVIDIA settings, in-game tweaks, frame caps) is actually visible on screen.
Cable choice and port selection
The cable and port combination you use determines three crucial things:
- Maximum refresh rate at 4K
- Support for VRR (G-Sync / FreeSync / HDMI VRR)
- Potential for extra input lag from TV/monitor processing
For 4K high refresh monitors:
- Prefer DisplayPort if the monitor supports it, especially for 120–144 Hz panels. DisplayPort 1.4 and above is designed with high refresh PC monitors in mind and tends to play very nicely with G-Sync/FreeSync.
- Use a short, good-quality DP cable plugged directly from the RTX 5090 to the monitor. Avoid daisy-chaining or docks.
- Only switch to HDMI if the monitor specifically advertises HDMI 2.1 with 4K 120 Hz and VRR, and you know the DisplayPort implementation is limited or buggy.
For 4K TVs:
- Most modern TVs are built around HDMI, not DisplayPort, so you’ll almost always use HDMI 2.1 from the GPU.
- Plug the cable into a HDMI 2.1 port on the TV that supports 4K 120 Hz and Game Mode (often labelled with “120”, “eARC/ARC”, or a little game icon in the TV manual).
- On the GPU side, use one of the native HDMI ports on the RTX 5090, not an adapter.
In all cases, make sure you’re using a certified high-bandwidth cable:
- For 4K 120–144 Hz with HDR, cheap “4K” HDMI leads that were fine at 60 Hz can cause flicker, dropouts or forced fallbacks to lower bandwidth modes.
- Look for DisplayPort cables rated for HBR3 / DP 1.4+, and HDMI cables marked as “Ultra High Speed” for 2.1.
Finally, double-check you’re on the correct ports at both ends:
- RTX 5090 → direct to the monitor/TV’s high-bandwidth port.
- No AV receivers, splitters or capture cards in between while you’re troubleshooting stutter.
Get this physical link right and you unlock true 4K high refresh with VRR and low latency – the foundation for everything else in your 4K optimisation stack.
Windows display settings
With the cable and ports sorted, the next step is telling Windows to actually run your 4K display at its native resolution and maximum refresh rate. If this is wrong, you’ll leave image quality and smoothness on the table – or introduce scaling weirdness that makes everything look soft.
Here’s a quick walkthrough.
1. Set native 4K resolution
- Right-click the desktop and choose Display settings.
- Under Scale & layout → Display resolution, select 3840 × 2160 (Recommended).
- If Windows is set to anything lower (e.g. 2560 × 1440 or 1920 × 1080), you’re no longer truly running 4K – the GPU is upscaling, which can add blur and latency depending on the path.
For text and icons, keep scale at a comfortable value (often 150% or 200% on a 27–32″ 4K screen). This doesn’t hurt in-game performance as long as the resolution is 3840 × 2160.
2. Choose the maximum refresh rate
Windows often defaults to 60 Hz even on a 120–144 Hz panel.
- In Display settings, scroll down and click Advanced display.
- Under Choose a refresh rate, pick the highest option (e.g. 120 Hz or 144 Hz) for your main gaming display.
- Make sure the active signal resolution shown here is also 3840 × 2160 – if it isn’t, something in the chain (cable, port, TV/monitor setting) is limiting the signal.
A low refresh rate will increase input lag and make stutter more obvious, even if the GPU is happily rendering 120+ fps.
3. Avoid awkward scaling paths
Some combinations of GPU scaling, display scaling and custom resolutions can create:
- Soft, slightly blurry images.
- Odd stutters or frame pacing issues.
As a simple rule for a 4K 5090 setup:
- Use native 4K in Windows and in-game wherever possible.
- Avoid forcing weird aspect ratios or non-standard resolutions via the GPU unless you have a specific competitive reason.
- If you need to run games at a lower resolution, use in-game render scaling or DLSS/FSR in Quality mode first, rather than setting Windows to a non-4K desktop resolution.
4. Colour depth and HDR (quick notes)
- Set colour depth to 10-bit if your display and cable support it and you’re using HDR, otherwise 8-bit is fine and can be more stable at very high refresh rates.
- For HDR, only enable it in Windows if your monitor/TV handles it well and you actually use HDR in games. Poor HDR implementations can add processing, which on some TVs slightly increases latency.
Once Windows is locked to native 4K at max refresh, with sensible scaling, you’ve ensured the RTX 5090 is feeding your panel exactly what it’s designed for – sharp, smooth 4K that responds properly to every optimisation you apply next.
VRR, G-Sync, FreeSync and V-Sync
To get your RTX 5090 feeling genuinely smooth at 4K, you need your display and GPU to stay in sync. That’s where VRR, G-Sync, FreeSync and V-Sync come in.
What VRR actually does
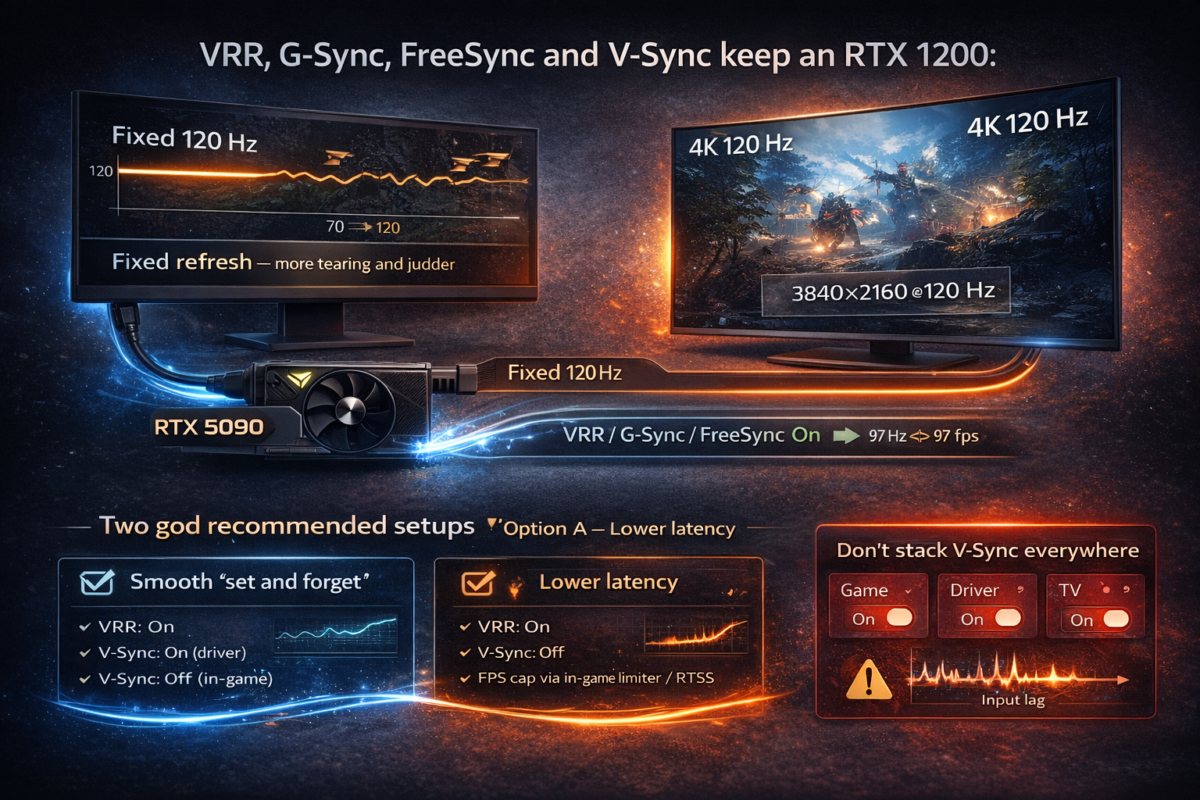
VRR (Variable Refresh Rate) lets your monitor or TV change its refresh rate on the fly to match the FPS your GPU is outputting. Instead of the screen refreshing at a fixed 120 Hz while the GPU is sending, say, 97 fps, the panel adjusts to ~97 Hz. That means:
- Less tearing (those horizontal rips).
- Fewer juddery frame pacing issues.
- A smoother feel when FPS naturally fluctuates in busy scenes.
G-Sync, FreeSync and “Compatible” on NVIDIA
On an RTX 5090:
- G-Sync – NVIDIA’s own adaptive sync tech, built into some monitors (G-Sync Ultimate/Native) or supported over standard VRR.
- FreeSync / “G-Sync Compatible” – many FreeSync monitors and TVs work with NVIDIA GPUs using the same underlying VRR standard.
- In the NVIDIA Control Panel, enabling G-Sync / G-Sync Compatible basically means: “Use VRR on this display when possible.”
If your monitor/TV is marked as G-Sync Compatible, that means NVIDIA has validated it for VRR with its GPUs, so you should be able to use adaptive refresh for smoother 4K gaming.
Two good patterns for smooth, low-lag 4K
There’s no single perfect setup for everyone, but these two patterns work well on a 5090:
Option A – “Set and forget” smoothness
- VRR: On (G-Sync / G-Sync Compatible enabled in NVIDIA Control Panel).
- V-Sync: On in the NVIDIA driver, off in-game.
- FPS cap: use an in-game limiter or RTSS to cap 2–3 fps below your refresh rate (e.g. 117–118 fps on a 120 Hz display).
Result: no tearing, very consistent frametimes, and VRR + V-Sync work together to keep things smooth at the top of the refresh range.
Option B – Lower latency, more “raw” feel
- VRR: On as above.
- V-Sync: Off in the driver and in-game.
- FPS cap: manage with the in-game limiter or RTSS to avoid wild spikes.
Result: can feel a touch snappier in some titles, with slightly more risk of tearing at very high FPS, but VRR still smooths most of the fluctuations.
Don’t stack V-Sync everywhere
One key rule: never enable V-Sync in multiple places at once. Avoid:
- V-Sync on in-game and in the driver and some extra TV setting trying to add “smoothing”.
That layering can add input lag and create odd stutter. Pick one place (ideally the NVIDIA driver, plus VRR) to handle sync and keep the rest clean.
Extra TV tweaks (if using a 4K TV)
If you’re gaming on a 4K TV instead of a dedicated monitor, the panel’s built-in processing can easily ruin what your RTX 5090 is trying to do. TVs are tuned for films and sports by default, not low-latency 4K gaming – so you need to flip a few key switches.
1. Turn on Game Mode
Almost every modern 4K TV has some form of Game Mode:
- Open the TV’s Picture or General settings.
- Look for Game Mode, Game Optimiser, or a similar label.
- Enable it on the HDMI input your PC is plugged into.
Game Mode does two critical things:
- Strips out a lot of image processing, which reduces input lag.
- Often unlocks 4K 120 Hz + VRR support on that HDMI port.
On many TVs, switching from a cinema preset to Game Mode can cut input lag from 50–100 ms down to 10–20 ms – the difference between sluggish mouse movement and crisp, responsive aiming.
2. Turn off motion smoothing
TVs love adding “smooth motion” for films, but for games this is a disaster:
- Find options like Motion Smoothing, TruMotion, MotionFlow, Auto Motion Plus (names vary by brand).
- Turn them off for the HDMI input used by your PC.
These features create fake frames between real ones, which adds latency and weird artefacts, especially in fast shooters or when panning quickly at 4K.
3. Disable extra processing (noise reduction, dynamic contrast, etc.)
Beyond motion smoothing, many TVs pack in extra “enhancements”:
- Noise reduction, MPEG noise reduction
- Dynamic contrast, Black frame insertion, Edge enhancement
- “Live colour” or heavy dynamic colour modes
For gaming, most of these should be off or set to their lowest setting. They:
- Add extra processing time per frame (more input lag).
- Can cause subtle flicker or brightness shifts that feel like micro-stutter.
- Sometimes interfere with VRR, causing black-screen flickers or dropouts.
4. Why Game Mode matters so much
Non-game picture presets assume you’re watching a film at a fixed 24/30 fps, not playing a game at 100–140 fps with VRR. They queue frames, analyse them and apply filters before showing them to you. That looks fine for movies but translates to:
- Noticeable delay between input and on-screen action.
- A “floaty” or “rubber band” feeling when you move the mouse or stick.
With Game Mode and the extra processing disabled, your 4K TV behaves much more like a proper 4K gaming monitor: you still get the big-screen wow factor, but with latency and smoothness that lets the RTX 5090 shine.
Step 3 – Optimise NVIDIA Settings for 4K Ultra
Clean driver install and keeping things stable
Before you start tweaking sliders in the NVIDIA Control Panel, make sure the software talking to your RTX 5090 isn’t already half-broken. A flaky driver or leftover files from an older card can be the hidden cause of stutter, black screens and weird frame pacing.
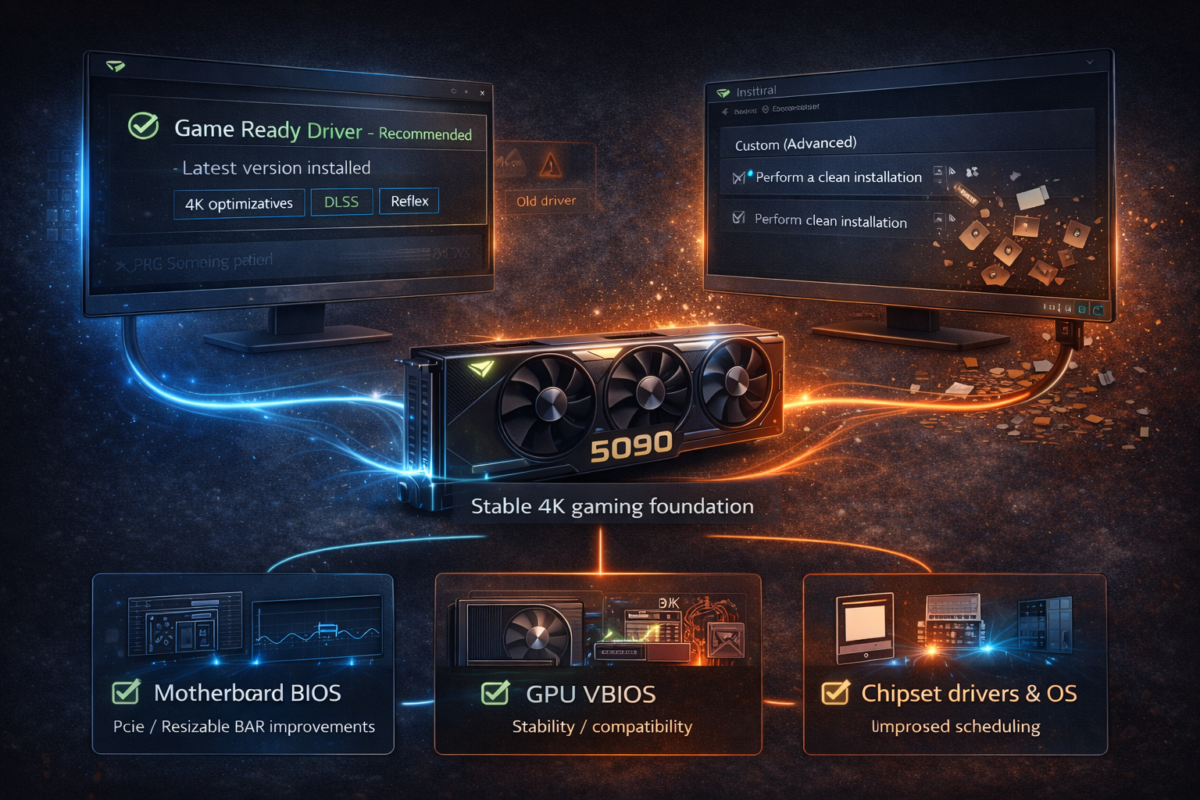
1. Update to a stable Game Ready driver
For 4K gaming on a 5090 you generally want the latest Game Ready Driver, not an old leftover from a previous GPU.
- Go to NVIDIA’s driver download page or use GeForce Experience.
- Choose the Game Ready (GRD) branch rather than Studio unless you mainly do creative work.
- Install the current stable release that supports your card and operating system.
Newer drivers often include:
- Game-specific optimisations for big AAA releases.
- Fixes for VRR issues, black screens, crashes and micro-stutter.
- Improvements to DLSS, Reflex and latency handling.
If a brand-new driver is causing problems for you personally, it’s fine to drop back one version to a known stable release – but don’t run months-old drivers just out of habit.
2. Use a clean install when changing GPU or fixing a messy setup
If you’ve upgraded from an older card, swapped brands, or you’re seeing strange behaviour (artefacts, driver resets, panel not detected), do a clean install:
- When running the NVIDIA installer, choose Custom (Advanced).
- Tick Perform a clean installation to wipe previous NVIDIA profiles and components.
This removes a lot of old cruft:
- Leftover profiles from your previous GPU.
- Potentially corrupted settings for G-Sync, scaling, colour and power management.
If your setup is truly cursed – drivers crashing, Control Panel refusing to open – you can go one step further and use a dedicated display driver uninstaller in Safe Mode, then reinstall fresh. That’s optional, but useful if nothing else seems to stick.
3. Don’t forget firmware and platform updates
Drivers don’t work in isolation. Some of the nastiest 4K stutters and black screens are fixed by updates that never mention “FPS” in the notes:
- Motherboard BIOS updates that improve PCIe stability or Resizable BAR behaviour.
- Occasional GPU VBIOS updates released by your card vendor to address power, fan or compatibility issues.
- Chipset drivers and Windows updates that refine GPU scheduling and USB/PCIe interaction.
You don’t need to chase every beta, but it’s worth checking your motherboard and GPU vendor’s support pages once in a while. Very often, those “random” hard stutters or black flashes at 4K are simply the result of an old driver or firmware that doesn’t fully understand a card as powerful as the RTX 5090. Fix the foundation, and the rest of your optimisation work becomes far more predictable.
Recommended global settings
Once your drivers are clean, set a sensible global profile in the NVIDIA Control Panel so every game starts from a strong baseline. You can then fine-tune per title where needed.
- Open the right menu
- Right-click desktop → NVIDIA Control Panel.
- Go to Manage 3D settings → Global settings.
- Make sure “Use the advanced 3D image settings” is selected.
- Power management mode
- Set Power management mode → Prefer maximum performance.
This keeps the RTX 5090 at higher clocks during gaming instead of down-clocking aggressively between frames, which can reduce frametime spikes and “surgey” feeling frame pacing. If you want to be a bit greener on the desktop, you can later make a separate power-saving profile and keep this one as your main gaming baseline.
- Low Latency Mode
- Set Low Latency Mode → On as a good default.
- Use Ultra if you’re mainly playing GPU-bound titles (most heavy AAA games at 4K) and you’re chasing the lowest possible input lag.
On trims the render queue without being too aggressive; Ultra pushes frames “just in time”, which can reduce latency further but may introduce instability in some CPU-bound or badly optimised games. If you see odd stutters with Ultra, drop back to On.
- V-Sync (and how it ties to VRR)
Decide how you want to handle sync globally:
- If you’re following Option A from earlier (VRR + V-Sync, FPS capped just below refresh), set Vertical sync → On here, and then leave V-Sync off in most games.
- If you prefer Option B (VRR + no V-Sync), set Vertical sync → Off globally and manage tearing/FPS caps in-game or via RTSS.
Avoid mixing and matching; the goal is one clear place controlling V-Sync to prevent extra latency and strange frame pacing.
- Texture filtering quality
- Set Texture filtering – Quality → High quality.
On a 5090, the performance hit is small, but it helps keep textures crisp at 4K, especially in distant geometry. If a particular game really struggles (rare on this card), you can drop that title’s per-game profile to “Quality” or “Performance”.
- Turn off conflicting scaling features
Unless you explicitly know why you’re using them, set:
- DSR factors → Off
- Image scaling → Off
- Any sharpening/upscaling features → Off globally
You want one scaling path at a time – usually in-game DLSS/FSR/XeSS. Stacking driver-level scaling on top of game-level reconstruction is a recipe for blur, shimmer, and extra frame-time overhead, all of which hurt the smooth 4K experience you’re chasing.
Per-game profiles for heavy titles
Even with a strong global profile, some heavy AAA titles behave better with custom per-game settings. Think of these as “overrides” where a specific game needs different frame caps or sync handling to stay smooth at 4K.
In NVIDIA Control Panel → Manage 3D settings → Program settings:
- Choose the game’s .exe from the list (or Add it manually from the install folder).
- Now tweak only what that title really needs.
A few useful rules of thumb:
- Keep AA/AF consistent – if the game has good built-in anti-aliasing and anisotropic filtering, let it handle those and leave the driver settings at Application-controlled. Doubling up rarely improves quality and can add overhead.
- Match V-Sync decisions – if you use V-Sync On in the driver globally, leave in-game V-Sync Off so you don’t stack them. If you prefer handling it in-game for that title, you can set the driver’s V-Sync to Use the 3D application setting for that profile.
Per-game Max Frame Rate caps are particularly useful in 4K:
- If your VRR range is, say, 48–120 Hz, and the game tends to bounce between 120–150 fps in menus or lighter scenes, you can:
- Set Max Frame Rate to 117–118 fps in that game’s profile, or
- Use the in-game limiter to do the same.
- This keeps the game in the “sweet spot” of your VRR range and avoids noisy oscillations at the top end that can show up as micro-stutter or coil whine.
Use per-game profiles for:
- Problem children (bad ports, inconsistent frametimes).
- Games with very different behaviour to your usual mix (e.g. a slower cinematic title vs a twitch shooter).
Your global profile stays clean, but each demanding title gets exactly what it needs for stable 4K.
Reflex and latency monitoring
With 4K visuals sorted, the next layer is input latency – how quickly your mouse or controller actions show up on screen. NVIDIA’s Reflex is built to help here, and the RTX 5090 can take full advantage.
When a game supports NVIDIA Reflex (you’ll usually see it in the graphics or gameplay options):
- Turn it On by default.
- Use On + Boost in competitive shooters or games where every millisecond matters.
Reflex works by coordinating the CPU and GPU render queue, reducing the time frames spend waiting around before they’re displayed. On a high-refresh 4K setup, this can make aiming and camera movement feel tighter and more connected.
Many modern titles also include latency overlays:
- Look for options labelled “Latency Metrics”, “NVIDIA Reflex Graph”, or similar.
- Enable them while testing your settings so you can see:
- System latency in milliseconds.
- How enabling Reflex, changing V-Sync, or adjusting FPS caps affects that number.
Use these overlays during your before vs after tests:
- Run a scene with Reflex Off, note the latency.
- Turn Reflex On / On + Boost, keep everything else the same, and compare.
Seeing latency drop from, say, 30 ms to the low 20s gives you hard proof that your RTX 5090 isn’t just prettier at 4K – it’s also more responsive. That data-driven feedback loop is what turns one evening of tweaking into a repeatable optimisation process for every new game you install.
Per-game profiles for heavy titles
Even with a strong global profile, some big AAA games behave better when you give them their own NVIDIA profile. Think of these as “house rules” for the worst offenders – the games with dodgy frame pacing, weird VRR behaviour or inconsistent 4K performance.
In NVIDIA Control Panel → Manage 3D settings → Program Settings:
- Pick the game from the list, or Add it by pointing to the .exe in your install folder.
- Only change what this game genuinely needs – don’t override everything just for the sake of it.
A few key principles:
- Keep AA/AF consistent.
- Let the game handle anti-aliasing and anisotropic filtering where possible.
- In the driver profile, leave Antialiasing – Mode and Anisotropic filtering on Application-controlled unless the game’s options are terrible.
- Doubling up (forcing AF x16 in the driver and again in-game) wastes performance and can cause visual glitches.
- Be deliberate with V-Sync.
- If you’re using the “V-Sync On in driver, Off in game” pattern globally, keep that for most titles.
- Only switch to “Use the 3D application setting” in the per-game profile if a particular game behaves better with its own V-Sync option.
- Avoid the classic mistake: V-Sync on in-game and in the driver and extra TV processing – that’s how you get rubbery input and weird stutter.
- Use Max Frame Rate to calm noisy VRR ranges.
- Some games love to spike over your monitor’s refresh or bounce around at the top of the VRR window, which can cause inconsistent frametimes or coil whine.
- In that game’s profile, set Max Frame Rate a couple of fps below your refresh (e.g. 117–118 on a 120 Hz panel, 138 on a 144 Hz panel).
- This keeps the game locked into the smooth part of your VRR range and stops wild fluctuations, especially in menus and cutscenes.
Use per-game profiles for your problem children: the titles where, even on an RTX 5090, you see strange stutter, tearing in certain scenes or unstable frame pacing at 4K. Once dialled in, you can forget about them – the profile loads automatically every time you launch that game.
Reflex and latency monitoring
With the visuals and FPS under control, the next win is making the game feel more “instant”. That’s where NVIDIA Reflex and in-game latency tools come in – particularly useful when you’re aiming for responsive 4K on a high-refresh display.
When a game supports NVIDIA Reflex (usually in the graphics or gameplay settings):
- For most players, set NVIDIA Reflex → On.
- For competitive shooters and twitchy titles, use On + Boost.
Reflex works by coordinating the CPU and GPU render queue, so frames are generated and displayed as close to your input as possible. On an RTX 5090 at 4K, this often shaves off a noticeable chunk of input lag – you’ll feel it in quicker camera snaps, more responsive ADS and less “float” when tracking targets.
Many Reflex-enabled games also include latency overlays or a Reflex latency graph:
- Enable these while testing your settings.
- You’ll usually see a readout for system latency in milliseconds.
- Run a repeatable scene or bot match with Reflex Off, note the number. Then turn Reflex On / On + Boost and compare.
Use that data when you’re tuning:
- If you see latency drop from, say, 30 ms to low 20s with no new stutters, keep Reflex On.
- If a particular title feels worse with On + Boost (rare, but can happen in CPU-bound games), drop back to just On and retest.
The goal is simple: combine Reflex + sensible FPS caps + VRR so your RTX 5090 isn’t just pushing ridiculous 4K frames, but delivering them with minimal delay from mouse/keyboard to screen – and you’ve got the numbers to prove it.
Step 4 – In-Game Settings That Kill Stutter Without Killing Image Quality
Heavy ray-traced / “cinematic” titles
For big showcase games – the kind with path tracing, full RT shadows and insane volumetrics – the RTX 5090 can look incredible at 4K, but you still need to be smart. The goal here is cinema-level visuals with stable frametimes, not a screenshot build that stutters every time you move.
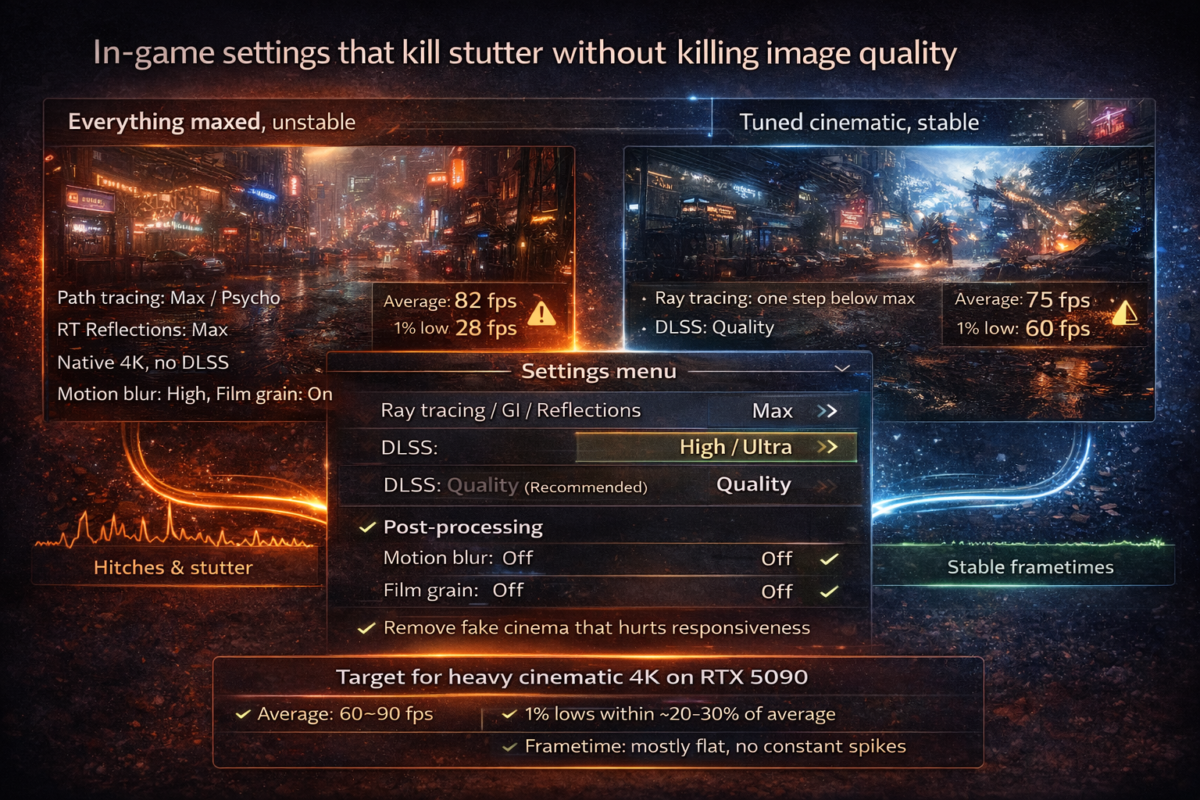
1. Start with Ultra, then dial back the right things
First pass:
- Load the game.
- Set the overall preset to Ultra (or equivalent).
- Restart the game if it asks – this ensures everything initialises correctly.
Then go back into the settings and customise Ultra instead of dropping all the way to High:
- Leave textures, geometry, draw distance and effects mostly on Ultra or Very High – the 5090 can handle those at 4K.
- Focus your cuts on ray tracing options and the heaviest post-processing.
2. Ray tracing: one notch down is often perfect
Full-fat RT or path tracing is brutally expensive, especially at 4K. On a 5090:
- Try setting global RT, reflections or GI one step below maximum – e.g. from Psycho → Ultra, or Ultra → High.
- Disable any “RT at every pixel” / super-sampled RT modes unless the game still holds stable performance after testing.
Visually, you keep most of the wow factor, but you massively reduce the chance of sudden RT-induced frametime spikes in busy scenes.
3. Use image reconstruction smartly (DLSS etc.)
At native 4K, even the 5090 can get punished in some titles. That’s where DLSS / FSR / XeSS earns its keep:
- Use DLSS (or equivalent) in Quality mode as your default for cinematic titles.
- If you’re struggling to hold 60–90 fps with good 1% lows, try stepping to Balanced – but only if it doesn’t introduce too much shimmer.
You’re effectively rendering at a slightly lower internal resolution, then upscaling – which smooths performance while keeping the 4K “look” intact on most displays.
4. Kill the fake “cinema” that hurts responsiveness
Turn off or reduce:
- Motion blur (especially camera blur).
- Film grain.
- Strong depth of field that smears the whole image whenever you aim.
These are cheap tricks designed for trailers, not responsive 4K gameplay. Disabling them:
- Makes the image clearer and cleaner.
- Reduces perceived input lag during fast mouse movement.
- Helps you spot stutter and frametime issues more easily.
5. Target: stable 60–90 fps with strong 1% lows
For these cinematic games, a realistic RTX 5090 target at 4K is:
- Average FPS: 60–90.
- 1% lows: within ~20–30% of that average.
- Frametime graph: mostly flat, no constant spikes.
That feels far better than a benchmark screenshot showing 120 fps average with 20 fps 1% lows and constant hitching. Prioritise stability and consistency over bragging rights, and your “true 4K ultra” experience will actually feel premium when you play, not just when you look at numbers.
Mainstream AAA titles
For most big-name AAA games – think popular open-world RPGs, action titles and racers – the RTX 5090 has enough VRAM and raw horsepower at 4K that you don’t need to gut the visuals. The trick is to protect frametimes and 1% lows by trimming the right settings instead of dropping everything from Ultra to High.
1. Lock in textures first
On a 5090, you almost always want:
- Textures: Very High / Ultra
- Texture streaming quality: High or better (where available)
You’ve got the VRAM to back this up at 4K, and high-res textures are one of the most noticeable quality wins. As long as your VRAM overlay isn’t constantly pegged at 100% with obvious swapping, keep textures maxed.
2. Shadows and reflections: prime targets to dial back
Instead of lowering the overall preset, go straight to:
- Shadows – set from Ultra → High, or High → Medium if needed.
- Reflections / Screen Space Reflections – drop one step, or reduce resolution/quality sliders.
Why? Because these are:
- Expensive on both GPU and CPU, especially in dense cities and foliage-heavy areas.
- Frequent causes of frametime spikes when lots of dynamic lights, weather or crowds appear.
A small hit here (e.g. Ultra → High shadows) usually:
- Has minimal visual impact at 4K, where sheer resolution hides a lot of fine shadow detail.
- Can shave off enough load to turn 45–50 fps dips into stable 60+ fps with healthier 1% lows.
3. Use reconstruction only when you need it
For mainstream AAA games that aren’t RT-heavy, test first at native 4K:
- Run a few busy scenes with your adjusted shadows/reflections.
- Check your average fps and 1% lows; if you’re comfortably above 60 with clean frametimes, you may not need any scaling.
If you’re close but not quite there:
- Enable DLSS/FSR/XeSS in Quality mode.
- Retest the same scenes and watch how your 1% lows and frametime graph change.
The aim is to treat reconstruction as a stability tool, not a default. With a 5090, many mainstream AAA titles can run native 4K with only modest compromises and still feel great.
4. Why these small compromises matter so much
Shadows and reflections touch:
- Large parts of the scene.
- A lot of pixels, often multiple times per frame.
- Both GPU shading and CPU draw calls.
That’s why a small downgrade here can yield disproportionately big gains in frametime stability. You keep the sharp 4K look and high-end textures, while quietly removing the worst offenders that cause random hitches, camera judder and low 1% lows – exactly what you notice when playing, even if the average FPS counter looks fine.
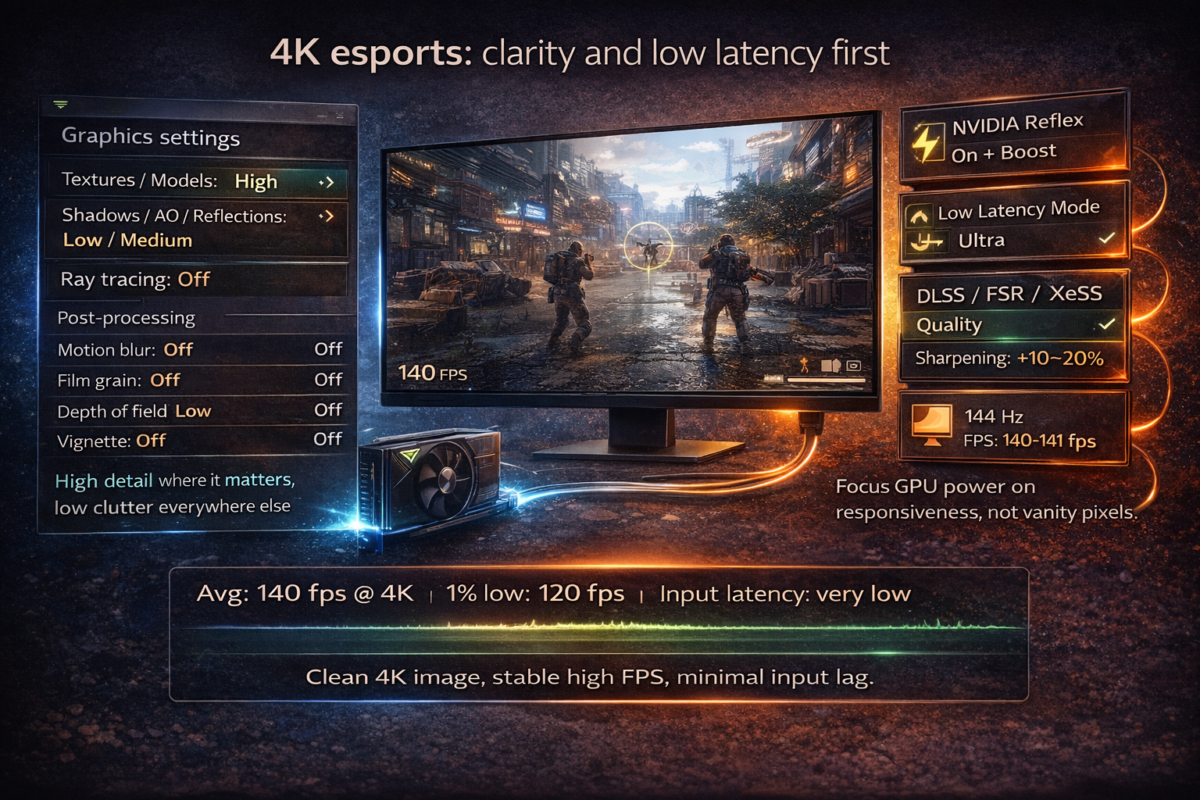
Competitive and esports games at 4K
When you’re playing competitive or esports titles at 4K, the priority flips: latency and clarity first, eye candy second. The RTX 5090 can easily brute-force big frame rates, but maxing every slider to Ultra often adds input lag and visual clutter you don’t actually want.
1. Favour a High/Medium mix, not full Ultra
For fast shooters, MOBAs and arena games:
- Use High for core detail (textures, effects, models).
- Set shadows, reflections and clutter to Medium or even Low.
- Disable or greatly reduce crowds, extra foliage and heavy volumetrics where the game allows.
At 4K, High already looks extremely sharp. Dropping some of the heaviest options keeps the GPU and CPU free to push very high, stable FPS, which is worth far more than slightly softer shadows when you’re tracking a target.
2. Use reconstruction only if you need it – but in Quality mode
If you’re struggling to hold your target (say 120–144 fps) at native 4K:
- Enable DLSS/FSR/XeSS in Quality mode first.
- Pair it with a touch of in-game sharpening if needed.
Quality mode keeps the image crisp enough for competitive play while improving frametimes and 1% lows. Avoid Performance mode in these games unless you absolutely have to – the aliasing and shimmer can make spotting enemies harder.
3. Maximise latency tools: Reflex, Low Latency Mode, FPS cap
For esports titles that support it:
- Turn NVIDIA Reflex → On + Boost. This aggressively minimises render queue delay and keeps GPU clocks ready for sudden load.
- In the NVIDIA Control Panel, use Low Latency Mode → On or Ultra (if the game behaves well with it).
Then set an FPS cap just under your monitor’s refresh:
- On a 144 Hz panel, cap at 140–141 fps.
- On a 120 Hz panel, cap at 117–118 fps.
You can do this via the in-game limiter or a tool like RTSS. The cap keeps frametimes stable, avoids VRR bouncing off the top of its range, and prevents the GPU thrashing at pointless 400 fps in menus.
4. Strip out all unnecessary post-processing
Turn off:
- Motion blur (world and weapon).
- Film grain.
- Heavy depth of field, vignette and bloom where they get in the way.
These effects:
- Make the image muddier during fast movement.
- Can hide micro-stutter and delay your brain’s reaction to visual changes.
- Often add a tiny bit of processing overhead for no competitive benefit.
The end result you’re aiming for is a clean, sharp 4K image with minimal clutter, very stable high FPS, and the lowest practical input lag. On an RTX 5090, that combo lets you enjoy the resolution bump of 4K without giving up the snappy feel that wins gunfights.
Competitive and esports games at 4K
For competitive and esports titles, “true 4K ultra” doesn’t mean maxing every slider – it means seeing enemies clearly and reacting instantly. On an RTX 5090, your priority is latency and visual clarity, not extra foliage or cinematic effects that only get in the way.
Start with a High/Medium mix instead of blanket Ultra:
- Set textures, models and effects to High so characters, weapons and projectiles stay crisp at 4K.
- Drop shadows, reflections, ambient occlusion and clutter to Medium or Low. These are expensive, constantly updated effects that hit both GPU and CPU, especially in busy team fights or chaotic firefights. Reducing them lowers frame-time variance and makes it easier to track motion on screen.
If you’re chasing very high refresh (120–144 Hz) and notice dips, bring in image reconstruction:
- Enable DLSS/FSR/XeSS in Quality mode first. At 4K, Quality usually looks extremely close to native, especially on a fast IPS or OLED panel.
- Add a touch of in-game sharpening if edges feel a little too soft. The aim is a crisp, readable image where enemies stand out from the background, not a smeary cartoon.
Then stack your latency tools:
- In supported games, set NVIDIA Reflex → On + Boost. This aggressively trims the render queue and keeps clocks ready for sudden bursts of action.
- In the NVIDIA Control Panel, use Low Latency Mode → On or Ultra (if the game behaves well with it).
- Cap your FPS just under your monitor’s refresh – for example, 140–141 fps on a 144 Hz screen or 117–118 fps on 120 Hz. Use the in-game limiter or RTSS. This keeps your output comfortably inside the VRR range, prevents micro-spikes at the top end and stops the card from thrashing out pointless frames.
Finally, strip away everything that makes the image “cinematic” but less playable:
- Turn motion blur off completely (world and weapon).
- Disable film grain, heavy depth of field, vignette and overly strong bloom.
- Reduce extra visual clutter like dense crowds, volumetric fog and overdone screen-space effects where the game allows.
The result is a clean, high-contrast 4K image, very stable high FPS and minimal input lag. You still get the benefit of 4K resolution for spotting heads and silhouettes at range, but the RTX 5090’s power is focused on what actually wins matches: fast response, consistent frametimes and crystal-clear visibility.
Extra tweaks that often help
Once you’ve sorted the big-ticket settings, there are a few “hidden” tweaks that can make a surprising difference to how smooth your RTX 5090 feels at 4K. They don’t change the overall look dramatically, but they can calm down CPU/GPU spikes that cause those annoying one-off stutters.
Field of View (FOV)
FOV is one of the most misunderstood performance knobs:
- A wider FOV means you see more of the world at once – great for awareness in shooters and open-world games.
- But it also means more pixels to draw and more objects on screen: more geometry, more shadows, more effects.
At 4K, this adds up quickly. Going from, say, 80 → 100 FOV can:
- Increase GPU load (you’re rendering more scene per frame).
- Increase CPU work (more enemies, physics and AI visible at once).
The trade-off:
- For competitive games, a slightly wider FOV is worth it for visibility, but don’t just max it blindly.
- For cinematic single-player titles, consider a moderate FOV that feels comfortable without dragging in a huge amount of extra scene every frame.
If you’re right on the edge of your target FPS or seeing spikes in dense areas, try nudging FOV down a couple of points and re-running your test scene – you might gain smoother frametimes with only a small change in how it looks.
Crowds, foliage and volumetrics
These three settings are classic spike generators:
- Crowd density / population
- More NPCs = more animations, AI and physics.
- Heavy crowd scenes hammer the CPU, not just the GPU.
- Dropping crowd density one step often removes big dips in cities and hubs.
- Foliage density / grass quality
- Thick grass and dense forests are expensive to draw and animate.
- At 4K, you can usually reduce foliage density or distance slightly without the world feeling empty.
- This helps both GPU load and CPU draw calls, especially when the wind system or physics get involved.
- Volumetrics (fog, god rays, smoke, clouds)
- Volumetric effects are some of the heaviest lighting features in modern games.
- Dropping volumetric quality or resolution one notch can significantly cut frametime spikes during storms, sunsets or explosive scenes.
The pattern is the same across games:
- Keep the core image quality high (textures, models, primary lighting).
- Gently lower FOV, crowds, foliage and volumetrics until your frametime graph looks clean and your 1% lows stop tanking.
These subtle tweaks let your RTX 5090 maintain a consistently smooth 4K experience, especially in those “stress test” moments where everything is happening at once on screen.
Step 5 – Manage Power, Temps and Noise So the 5090 Stays Fast
A lot of “random” stutter on an RTX 5090 isn’t about settings at all – it’s about the card quietly hitting thermal or power limits in the background. When that happens, clocks dip, fans ramp, and your frametime graph starts showing ugly spikes, even if your average FPS looks decent.
This step is about keeping the 5090 in its comfort zone: cool enough, with clean airflow and sensible fan behaviour, so it can hold high clocks for long sessions without bouncing off power or temperature ceilings.
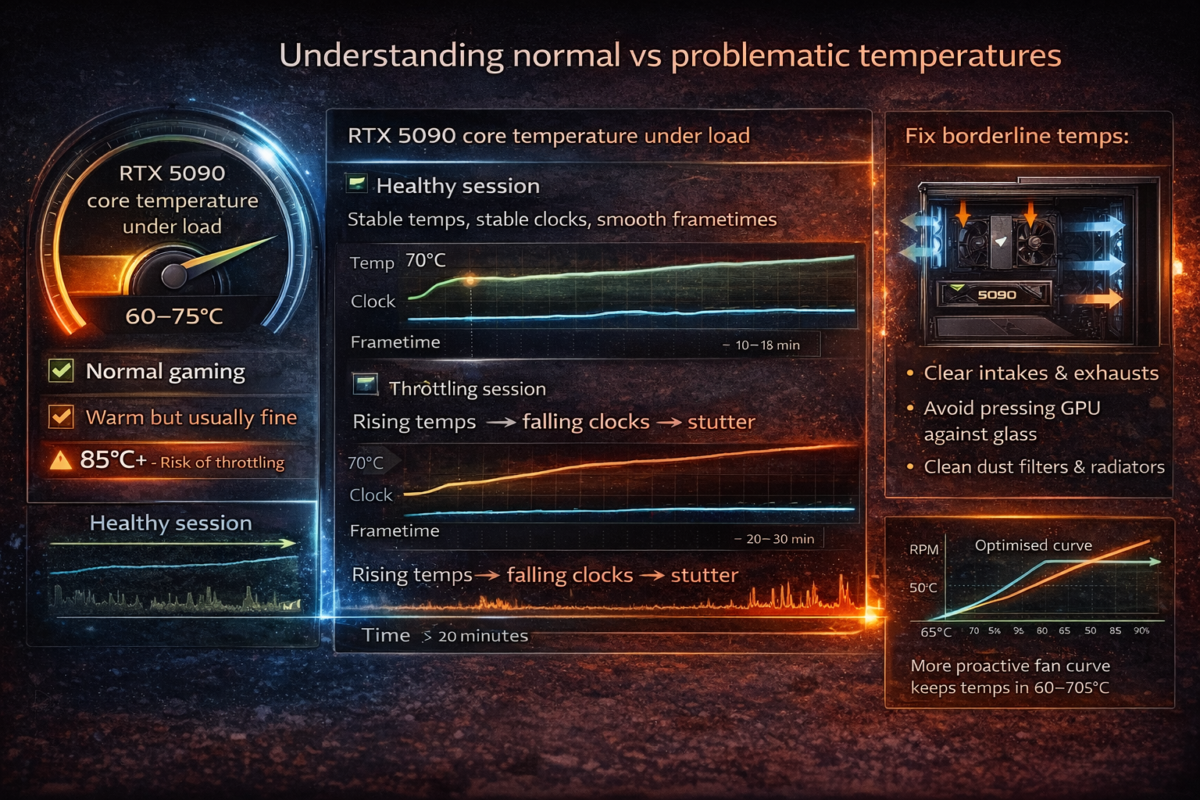
Understanding normal vs problematic temperatures
Modern GPUs are designed to run warm, so a high number on its own isn’t automatically bad. What matters is how the temperature behaves over time and whether it’s forcing the card to slow down.
As a rough guideline for a 5090-class card under load:
- Normal gaming temps: roughly 60–75°C core in a well-ventilated case.
- Warm but usually fine: 75–82°C, especially in smaller cases or during long heavy loads.
- Worth investigating: consistently mid-80s°C and above, or sudden jumps to near the thermal limit as soon as a game gets busy.
The key sign of thermal throttling isn’t just the number – it’s what happens to your clocks and frametimes:
- GPU core clocks start high, then gradually drop by a few hundred MHz as the session goes on, even though the workload hasn’t changed much.
- You see stutter after 20–30 minutes of play, not right at launch.
- Fans ramp dramatically (audible whoosh) just before or during hitching, then calm down again.
You can confirm this with an overlay (e.g. GPU temperature, clock speed and utilisation). If temps climb, clocks fall and frametime spikes appear together, the card is likely backing off to protect itself.
To fix borderline temps, start with case airflow:
- Make sure you have at least one or two good intakes at the front and an exhaust at the rear/top.
- Check that the 5090’s fans aren’t pressed up against a glass side panel or crammed next to another hot card.
- Clean any obvious dust build-up on filters and radiators – clogged intakes can easily add several degrees.
Then look at fan curves:
- In your GPU software or a tool like Afterburner, choose a slightly more aggressive fan curve so fans spin up earlier instead of waiting until the card is already roasting.
- Aim for a balance where the GPU stays in the 60–70s°C range under your heaviest games, even if that means a bit more fan noise.
Keeping the RTX 5090 comfortably below its thermal limits stops it from yo-yoing its clocks, which translates directly into more consistent frametimes and fewer mid-session stutters at 4K.
Simple undervolting for smoother, quieter 4K
Once your RTX 5090 is running within safe temps, a light undervolt can help it stay there more gracefully: similar performance at lower voltage, which usually means less heat, less noise and more consistent clocks. That combination is great for 4K frametimes – the card stops bouncing between “cool and fast” and “hot and throttling”.

At a high level, undervolting works like this:
- Every GPU has a voltage–frequency curve that says “at X volts, run at Y MHz”.
- By gently lowering the voltage at a given clock speed, you ask the card to do the same work more efficiently.
- If the chip is happy at that point, it will run cooler and quieter with fewer spikes, which often translates into steadier frametimes at 4K.
A basic, high-level workflow (exact steps vary by tool and card):
- Open a curve editor
- Use a trusted tool that exposes the GPU’s voltage–frequency curve (for many users, that’s MSI Afterburner or your card vendor’s software).
- Make sure any existing overclocks are removed so you’re starting from a known-good baseline.
- Pick a sensible target clock and voltage
- Look at what clock speed your 5090 tends to hold in a demanding game when fully warmed up (for example, 2.7–2.8 GHz – numbers will vary).
- Find a point on the curve around that clock, then choose a slightly lower voltage for it (e.g. where it can hold that clock or just below).
- Gently pull down the curve
- In the editor, drag the curve down at your chosen voltage so the GPU runs that clock at the lower voltage.
- Smooth the surrounding points so the curve isn’t jagged – you want a clean slope, not sudden steps.
- Apply and test for stability
- Apply the new curve and run a demanding game or stress test at 4K for at least 20–30 minutes.
- Watch for crashes, driver resets, visual artefacts or sudden downclocks. If any appear, you’ve gone too far – either raise the voltage slightly or reduce the target clock.
- Refine or revert
- If it’s stable, you can try very small further reductions to see how low you can go while keeping performance.
- If you’re not comfortable or something feels off, simply reset to default – every good tool has a way to do that.
Undervolting is optional and a bit advanced. Done carefully, it doesn’t magically add FPS, but it often makes your RTX 5090 run cooler, quieter and more consistently, which is exactly what you want for long 4K sessions where stutter tends to creep in after the first half hour. If you’re not confident, you can happily skip this step and still get excellent results from the rest of the guide.
When (and when not) to raise the power limit
Power limit sliders are one of the first things people grab when they get a high-end GPU, but on an RTX 5090 aimed at smooth 4K, they’re not always the magic lever they’re made out to be.
The power limit tells the card how much electrical “budget” it’s allowed to use before it starts reigning in clocks. Raising it gives the GPU more headroom to boost higher, but only when it’s already hitting the default limit and still has thermal space left.
Where a higher power limit can help:
- You’re chasing the highest possible FPS in GPU-bound titles.
- You’re running at very high refresh rates and don’t cap your frame rate.
- The card is frequently hitting its power limit (you’ll see this as a “Pwr” or similar flag in monitoring tools) while temperatures are still reasonable.
In that scenario, bumping the power limit can let the 5090:
- Hold slightly higher boost clocks under sustained load.
- Reduce the amount of clock oscillation when scenes get complex.
However, for many 4K setups built for smooth, capped gameplay, raising the power limit does surprisingly little for the experience:
- If you’re already capping FPS just under your monitor’s refresh (say 117–118 fps on 120 Hz, or 140–141 fps on 144 Hz), the GPU doesn’t need extra power to chase higher numbers – it will naturally sit somewhere below its maximum capability.
- VRR (G-Sync/FreeSync) plus a sensible cap means you’re aiming for consistent frametimes, not headline benchmark scores. Once you’re hitting that target reliably, more power limit just means more heat and fan noise for virtually no visible gain.
There are also downsides to cranking it up without a reason:
- Higher power limits can push the card closer to thermal limits, which may actually increase throttling in hotter cases.
- You’ll likely see higher power draw at the wall and louder fans, with little or no improvement in 1% lows or perceived smoothness at 4K.
A practical rule:
- If your frametimes are already flat, your FPS cap is being met comfortably, and you’re not seeing the card slam into its power limit in monitoring tools, leave the power limit at stock.
- Only consider increasing it when you’ve confirmed that power, not temperature or CPU, is the thing holding clocks back—and you genuinely care about squeezing a few extra frames rather than keeping the system cooler and quieter.
For most RTX 5090 owners running capped, VRR-backed 4K, smart settings and good thermals will do far more for smoothness than pushing the power limit to the maximum.
Step 6 – Test Your Changes and Prove They Worked
By this point you’ve changed a lot: hardware basics, NVIDIA settings, in-game options, power and temps. Now you want to know if it’s actually better, not just “feels a bit smoother tonight”. Step 6 is where you measure: FPS, frametimes, utilisation and, where possible, latency.
The aim is simple: build a quick, repeatable way to say “yes, this RTX 5090 is now delivering smoother 4K than before” – and to spot what’s still holding you back if it isn’t.
Tools to see FPS, frametimes and utilisation
The easiest way to get proper data is to run a performance overlay on top of your game. You can use:
- A GPU overlay such as MSI Afterburner with RTSS, or your card vendor’s own monitoring tool.
- In-game performance graphs where available (many modern titles have their own FPS/frametime views).
Whichever you choose, aim to show at least:
- FPS (frames per second) – the headline number, but not the full story.
- Frametime (ms) – either as a live number or, ideally, a graph over time.
- GPU utilisation (%) – how hard the RTX 5090 is working.
- CPU utilisation – per core/thread if possible, or at least overall.
Optional but useful:
- VRAM usage – to catch cases where you’re right on the edge with Ultra textures.
- System RAM usage – to confirm 32 GB is enough for your workload.
What to look for:
- A flat-ish frametime graph (for example, hovering around 8–12 ms at high refresh) with few big spikes. Those spikes are the micro-stutters you actually feel.
- GPU utilisation high (90–99%) and CPU not pegged → mostly GPU-bound, which is what you expect at 4K.
- GPU utilisation low and one or more CPU cores maxed → you’re CPU-limited, so game settings that hammer the CPU (crowds, view distance, streaming) are the ones to tweak.
Try to use the same overlay, same metrics and same on-screen location every time you test. That way, when you later run your “before vs after” benchmark scenes, you’re comparing like with like and can clearly see whether your RTX 5090 is now delivering the smooth, stable 4K you built this whole setup for.
How to do a simple “before vs after” test
You don’t need a full lab setup to prove your RTX 5090 is running better at 4K – just a repeatable test and a bit of discipline. The idea is to create a mini benchmark you can rerun every time you change something big.
1. Pick repeatable test scenes
Choose one or two spots per game that are easy to recreate:
- A busy city street or hub area.
- A combat encounter you can replay (training range, wave mode, early mission).
- Or the game’s own built-in benchmark, if it has one.
The key is that you can come back to the same view, same time of day, same weather later and get comparable results.
2. Run your “before” test
Before you change anything major:
- Turn on your overlay or performance graph (FPS, frametime, GPU/CPU usage).
- Stand in your chosen spot or run the benchmark.
- Record:
- Average FPS.
- 1% lows (or at least a feel for the lowest dips).
- A quick look at the frametime graph – how spiky it is.
- Pay attention to how it feels:
- Do fast camera pans judder?
- Does aiming feel a bit “floaty” or delayed?
You can jot the numbers in a simple notepad or spreadsheet – nothing fancy.
3. Apply the guide, then run the “after” test
After you’ve worked through the key steps in this guide (system, display, NVIDIA settings, in-game tweaks):
- Load the same save/scene or built-in benchmark.
- Make sure conditions match as closely as possible (same graphics preset, difficulty, etc., aside from your new tweaks).
- Run the test again and capture the same data points.
Now compare:
- Has average FPS moved up or become more stable?
- Did the 1% lows improve (for example, from 40 → 60 fps)?
- Does the frametime graph look flatter, with fewer big spikes?
4. Don’t forget “feel” as a metric
Numbers matter, but so does your own perception:
- Do fast 180° camera pans look smoother and less juddery?
- Does your mouse or controller input feel more immediate?
- Are the little “hitches” you used to notice in certain spots either gone or much rarer?
A good “after” result isn’t always a massive FPS jump – often it’s similar or slightly better averages, but with stronger 1% lows, cleaner frametimes and noticeably less input lag. That’s the difference between a 4K setup that looks good in screenshots and one that actually feels great every time you play.
Troubleshooting – If Your RTX 5090 Still Stutters at 4K
Even with clean settings and a solid system, some rigs will still hitch, micro-stutter or black-screen at 4K. When that happens, the next step is to treat it like a compatibility problem: something in the firmware/driver stack that “talks” to the GPU is out of date, buggy or misconfigured.
Update everything that talks to the GPU
Work down this short list in order. You only have to do it properly once, but it can fix some of the nastiest, most confusing stutters.
1. Motherboard BIOS
Your RTX 5090 sits on the PCIe bus controlled by your motherboard. Old BIOS versions can have:
- Flaky PCIe power/initialisation behaviour.
- Broken or incomplete Resizable BAR / Above 4G Decoding support.
- Stability issues with newer CPUs and high-power GPUs together.
Check your motherboard model on the manufacturer’s site and see if there’s a reasonably recent stable BIOS. If the notes mention PCIe, stability, Resizable BAR, new GPU support or memory fixes, it’s worth updating. Follow the vendor’s instructions carefully and don’t interrupt the process.
2. GPU VBIOS (where relevant)
Some board partners occasionally release VBIOS updates for their RTX 50–series cards to fix:
- Power limit quirks.
- Fan curve bugs.
- Black-screen or wake-from-sleep issues.
Visit your GPU manufacturer’s support page, look up your exact model, and see if there’s a newer VBIOS utility. Only flash if it explicitly lists fixes relevant to you, and always use the official tool.
3. GPU driver – clean and current
If you haven’t already as part of this guide:
- Install the current stable Game Ready driver for the RTX 5090.
- If you’re coming from a very old install or a different GPU, perform a clean installation so old profiles and leftovers don’t interfere.
Many mysterious 4K issues – VRR flicker, random stutters, intermittent device resets – are quietly fixed in driver changelogs.
4. Game patches and redistributables
Finally, make sure the game itself is up to date:
- Install any patches or hotfixes – modern AAA titles often get multiple waves of performance fixes after launch.
- Let launchers install required DirectX/Visual C++ components when prompted.
A fully updated BIOS + VBIOS + driver + game stack gives your RTX 5090 the best chance of behaving like the flagship GPU it is. If you still see stutter after this, you can be more confident the issue is with hardware, specific settings or background software, not an obvious missing update.
Check CPU and memory stability
If you’ve followed the optimisation steps and your RTX 5090 still gives random stutters, crashes or black screens, especially under long sessions, there’s a good chance the issue isn’t the GPU at all – it’s CPU or memory instability
This is especially common if you’ve:
- Overclocked your CPU.
- Tightened RAM timings or pushed high frequencies.
- Enabled aggressive auto-overclock features in the BIOS (PBO, “Game Boost”, “Multicore Enhancement”, etc.).
Even tiny instabilities that never show up on the desktop can surface as:
- Sudden frame hitches or audio pops.
- “Driver crash” messages mid-game.
- Full system reboots during heavy 4K loads.
1. Test at stock settings first
If you’re running any kind of overclock:
- Go into the BIOS and load optimised defaults or manually set the CPU and RAM back to official stock values.
- Disable automated “game” or “turbo” presets that push voltage/frequency beyond spec.
- Keep essential options like Resizable BAR and XMP/EXPO if they’re known stable; if in doubt, you can even turn XMP/EXPO off temporarily to see if the RAM profile is part of the problem.
Then play your usual 4K games for a while:
- If stutters and crashes disappear at stock, your previous overclock was marginal – even if synthetic benchmarks seemed fine.
- From there, either keep the system stock for maximum stability or rebuild a more conservative overclock and re-test.
2. Use stress tests and long gaming sessions
To separate settings issues from hardware stability:
- Run a CPU stress test (or a demanding workstation load) for 20–30 minutes and watch for errors, throttling or crashes.
- Use a memory test tool or an intensive game known to hammer RAM (big open-world titles at 4K are good for this).
Then do what really matters: play as you normally would for an extended session:
- If stutters and odd behaviour only appear after an hour or two, that’s a strong sign of heat soak and instability, not just “bad settings” in a menu.
- If your system survives both stress tests and long gaming runs at stock, you’ve got a solid baseline to compare against any future tweaks.
The key idea: don’t blame the RTX 5090 for problems caused by a wobbly CPU or RAM overclock. Confirm stability first, then layer your 4K optimisation back on top of a platform you know is rock solid.
PCIe slot, risers and physical issues
If your RTX 5090 is still acting up after software tweaks, it’s worth double-checking the physical connection to the motherboard. A flagship card that isn’t seated properly or is running through a dodgy riser can absolutely cause stutter, black screens and random device disconnects.
Start with the basics:
- Make sure the 5090 is installed in the primary PCIe x16 slot – usually the top full-length slot closest to the CPU.
- Check your motherboard manual if you’re unsure; some boards only run lower slots at x4 or share lanes with other devices, which can affect stability and bandwidth.
If you’re using a vertical mount or riser cable:
- Avoid cheap, unbranded risers, especially if they weren’t designed with PCIe 4.0/5.0 in mind.
- If you suspect the riser, test the RTX 5090 directly in the primary x16 slot without it. If the problems vanish, you’ve found your culprit.
It’s also worth reseating the card:
- Power down the PC and switch off at the PSU.
- Disconnect the GPU power connectors.
- Carefully release the PCIe slot latch and remove the card.
- Check for dust, debris or bent contacts in the slot.
- Reseat the card firmly until you hear/feel the latch click, then reconnect the power cables securely.
Loose or partially inserted PCIe power connectors can also cause hard stutters and shutdowns under load, so double-check each one is fully engaged with no wobble. If issues persist after reseating, you’ve at least ruled out one of the most common physical causes.
When to suspect a faulty card
Not every stutter is a bad GPU – most are caused by settings, drivers or the rest of the system. But sometimes, the hardware itself is the problem. You should start to suspect a faulty RTX 5090 if you see consistent issues across different games and setups.
Typical red flags:
- Visual artefacts in multiple titles: flickering geometry, random coloured blocks, “snow” or checkerboard patterns that don’t match normal game bugs.
- Crashes or black screens that happen in several games and during synthetic benchmarks, even after clean driver installs.
- The same problems occur when you test the card in another known-good PC – and other GPUs work fine in your system.
Before you conclude the card is bad, make sure you’ve:
- Updated motherboard BIOS, GPU driver and any available VBIOS from the card vendor.
- Tested at stock CPU/RAM settings with a clean driver installation.
- Verified power supply quality, cabling and PCIe slot choice.
If the RTX 5090 still misbehaves after all that, it’s time to involve the seller:
- Contact your retailer or the GPU manufacturer’s support.
- Provide clear notes on what you’ve tested: games tried, driver versions, temperature logs, whether you’ve tested in another system, and screenshots/photos of artefacts if possible.
Good documentation makes it far easier to get a warranty replacement (RMA) approved quickly and avoids the back-and-forth where you’re asked to repeat basic troubleshooting you’ve already done.
Ready-Made 4K Profiles You Can Copy
“Cinematic 4K Ultra” (60–90 fps target)
This profile is for single-player, story-driven games where you want that “showpiece” look: rich lighting, detailed worlds, big set pieces. The RTX 5090 can deliver that at 4K – as long as you’re happy to target smooth 60–90 fps rather than chasing 144 Hz.
Think of this as your “sit back with a controller” preset.
Goal
- Resolution: 4K (3840×2160)
- Target: 60–90 fps with solid 1% lows
- Feel: Big visual wow, but still responsive enough that stutter doesn’t pull you out of the moment
Display & sync
- Refresh rate: set panel to 120 or 144 Hz if available.
- VRR: On (G-Sync / G-Sync Compatible / FreeSync).
- V-Sync:
- On in NVIDIA driver, Off in-game (Option A from earlier).
- FPS cap:
- Cap at 70–85 fps using in-game limiter or RTSS (a sweet spot between wow and smoothness).
NVIDIA settings (global or per-game)
- Power management: Prefer maximum performance.
- Low Latency Mode: On (no need for Ultra here).
- Texture filtering quality: High quality.
- Scaling features (DSR, Image Scaling): Off, unless you know exactly why you’re using them.
In-game graphics template
Use the game’s Ultra preset once, then tweak:
Keep high / ultra
- Textures: Ultra / Very High
- Geometry / world detail / draw distance: High → Ultra
- Primary lighting and shadows: High or Ultra (depending on how heavy the game is)
- Ambient occlusion: High
Dial back slightly
- Ray tracing:
- Turn RT On but one step down from max (Ultra instead of Psycho, High instead of Ultra).
- Disable “insane” RT options if they tank FPS.
- Reflections: drop one quality notch if you see dips in rainy cities or water-heavy scenes.
Use reconstruction smartly
- Enable DLSS/FSR/XeSS in Quality mode as your default for heavy titles.
- Step to Balanced only if you genuinely can’t hold 60+ fps with good 1% lows.
Turn off the fake cinema
- Motion blur: Off (or very low).
- Film grain: Off.
- Aggressive depth of field: Medium or Off if it’s smearing the whole picture.
Those “cinematic” filters are great for trailers, but they add mushiness and can hide micro-stutter. With them off, you keep a clean, sharp 4K image and it’s much easier to feel the benefit of all the optimisation work you’ve done: a stable, smooth 60–90 fps RTX 5090 experience that actually looks like a next-gen showcase.
“High Refresh 4K” (100–144 fps target)
This profile is for players with 120–144 Hz 4K monitors who want that buttery-smooth feel: fast camera pans, crisp mouse input and minimal judder, while still looking clearly “4K high-end” rather than washed-out competitive settings.
Goal
- Resolution: 4K (3840×2160)
- Target: 100–144 fps, with strong 1% lows
- Feel: Very smooth, responsive, still clearly high quality – a balance between cinematic and esports
Display & sync
- Refresh rate: set to 120 or 144 Hz in Windows.
- VRR: On (G-Sync / G-Sync Compatible / FreeSync).
- V-Sync options:
- Recommended: V-Sync On in NVIDIA driver, Off in-game, as in Option A.
- FPS cap:
- Cap 2–3 fps below refresh:
- 120 Hz → 117–118 fps
- 144 Hz → 140–141 fps
- Use the in-game limiter or RTSS.
- Cap 2–3 fps below refresh:
This keeps you in the sweet spot of the VRR range, avoids hitting the hard refresh ceiling and reduces micro-stutters from wild fluctuations.
NVIDIA settings
- Power management: Prefer maximum performance.
- Low Latency Mode: On (or Ultra if the game behaves well and is mostly GPU-bound).
- Texture filtering: High quality.
- Scaling features (DSR, Image Scaling): Off globally; rely on in-game DLSS/FSR/XeSS.
In-game graphics template
We’re trading a little eye candy for stable high refresh.
Keep high / very high
- Textures: Very High / Ultra (VRAM can handle it).
- Geometry / world detail: High.
- Effects: High, unless the game is notoriously heavy here.
Reduce for stability
- Shadows: High → Medium or High, depending on the game. Shadows are a big hit at 4K and a classic source of frametime spikes.
- Reflections: drop a notch – especially screen-space reflections and very high quality mirror/water effects.
- Ray tracing:
- Prefer Off or a modest RT setting (e.g. RT Medium/High instead of Ultra) in fast-paced titles.
- Use full-fat RT only in lighter games where you can still hold 100+ fps.
Reconstruction and sharpening
- Default to DLSS/FSR/XeSS in Quality mode if you can’t quite hold your target fps.
- Add a bit of sharpening to keep the 4K image crisp.
Polish for responsiveness
- Motion blur: Off.
- Film grain: Off.
- Depth of field: Low/Medium at most.
- Reflex (if supported): On (or On + Boost if you lean competitive).
This profile turns your RTX 5090 into a high refresh 4K workhorse: you still get a clearly premium image, but with frametimes tight enough that 120–144 Hz actually feels as smooth as it should.
“4K Competitive Hybrid” (latency first, still looks good)
This profile is for shooters and competitive titles at 4K when you want every advantage – fast response, clean visibility – but you don’t want the game to look like it’s running on a toaster. Think of it as a ranked/comp preset: practical, sharp, and focused on performance.
Goal
- Resolution: 4K (3840×2160)
- Target: high, stable fps close to your monitor’s refresh
- Feel: Snappy input, clean visuals, enemies easy to spot
Display & sync
- Refresh rate: 120 or 144 Hz in Windows.
- VRR: On (G-Sync / G-Sync Compatible / FreeSync).
- V-Sync:
- Often best Off in-game and Off in driver for pure competitive feel, with VRR smoothing out most tearing.
- FPS cap:
- Cap just under refresh (e.g. 140–141 fps at 144 Hz, 117–118 fps at 120 Hz) using in-game limiter or RTSS.
Latency features
- NVIDIA Reflex (if supported): On + Boost.
- NVIDIA Control Panel: Low Latency Mode → Ultra (if the game plays nicely with it).
- Keep background apps closed – especially overlays, capture tools and heavy RGB suites.
In-game graphics templat
Core quality
- Textures: High (or Ultra if VRAM usage is comfortable).
- Models/characters: High – you want clean silhouettes and readable detail.
Performance trims
- Shadows: Medium (or Low if they’re particularly heavy in that game).
- Reflections, ambient occlusion, volumetrics: Medium/Low – enough for contrast, not enough to tank frametimes.
- Crowds/foliage density: Reduced; less clutter = easier target tracking and fewer CPU spikes.
Post-processing & clarity
- Motion blur: Off.
- Film grain, vignette, strong depth of field: Off.
- Bloom and lens flare: toned down so they don’t wash out targets.
- Use DLSS/FSR/XeSS in Quality mode if needed to stabilise fps, plus a bit of sharpening for edge clarity.
The end result is a 4K image that’s clean and readable, not “muddy cinematic”, with latency tools maxed and settings tuned so your RTX 5090 spends its power on what matters: consistent frametimes, fast feedback and enemy shapes that pop against the background instead of blending into eye candy.
It can run most modern games at 4K with ultra-grade visuals, but not every title will do maxed-out everything at high refresh. Very heavy ray-traced games, badly optimised ports or extreme CPU-bound scenarios may still need tweaks: using DLSS/FSR in Quality mode, dropping ray tracing one notch and trimming shadows/reflections slightly to keep 1% lows and frametimes smooth.
Aim for 4K at 60–120 fps with strong 1% lows, not just the highest average FPS. Use: textures on High/Ultra, shadows/reflections one step down, VRR (G-Sync/FreeSync) enabled, V-Sync controlled in one place (usually the NVIDIA driver) and an FPS cap a few frames below your refresh rate. Install games on an NVMe SSD, keep drivers/BIOS up to date, close heavy background apps and monitor frametimes, not just FPS.
On a monitor: set native 4K, max refresh (120/144 Hz), enable VRR and use Low Latency Mode (On/Ultra) plus NVIDIA Reflex where available, with an FPS cap just under refresh. On a TV: enable Game Mode, turn off motion smoothing and extra processing, use HDMI 2.1 with a certified cable, then combine VRR + Reflex + a sensible FPS cap. Avoid stacking V-Sync in multiple places.
No. A stock RTX 5090 is already fast enough for smooth 4K when the rest of the system is set up correctly. Overclocking brings small gains but more heat and potential instability. A light undervolt can make the card cooler, quieter and more consistent, but it’s optional and should be done carefully. For most people, correct settings, airflow and a good FPS cap matter far more than manual voltage or clock tweaks.
First, update everything that touches the GPU: GPU driver, Windows, game patches, motherboard BIOS, and any available GPU VBIOS from your card vendor. Then check temps and power (no throttling, decent PSU, good airflow), test CPU/RAM at stock settings, ensure the card is in the primary PCIe x16 slot with solid cabling, and run a monitoring overlay to see if you’re CPU-bound. If multiple games still show artefacts or crashes, test the card in another PC and consider an RMA.